How Tall Do Raspberry Bushes Grow?

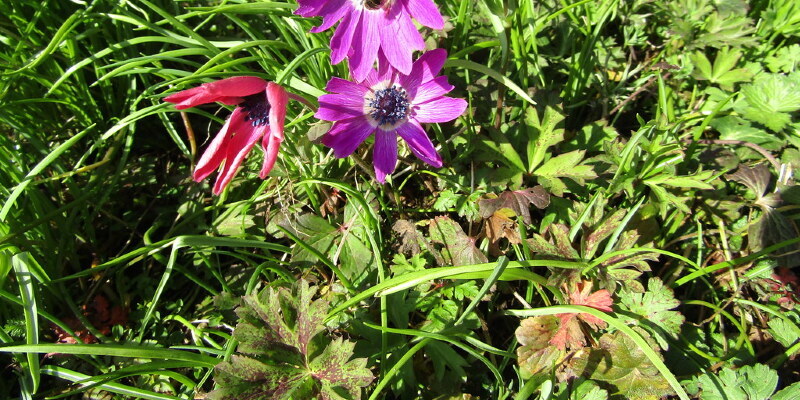
Raspberries come in many different colors which have the conventional red together with black, yellow and purple. Each variety demands similar growing conditions and is fairly easy to raise and maintain. Raspberries normally reach heights of 36 to 60 inches tall with a 24 to 36 inch spread. However, pruning is an important characteristic of growing strawberries, along with the pruning techniques may vary by raspberry variety. You may develop freestanding plants or use support and prune them to keep shape and size.

Planting Raspberries

Because raspberries can grow tall and wide, it is important to space them correctly, because they need good air circulation to assist leaves dry quickly and reduce the danger of disease. When planting, space yellow and red raspberries plants 2-3 feet apart and leave about 8 feet between rows. Purple and black raspberries require 3 to 4 feet spacing between plants and 8 to 10 feet between rows. You are able to plant raspberries in fall or early spring at a location with full sun and great drainage.

Red and Yellow Raspberry Growth

Red raspberries are perennials that make thorny, biennial canes. The summer-bearing variety grows to full size the first year and produces fruit the second year. Everbearing varieties of yellow and red raspberries grow two plants on the exact canes. These varieties bear fruit at the fall of the first year and in the summer of this second year. Red and yellow raspberry varieties may grow as shrubs or you can stake them. The plants are easier to manage and have a tidier look when grown utilizing a stake or trellis system

Black and Purple Raspberry Growth

Black and purple raspberries are clump-forming plants which make arching canes and produce fruit in summer. They do not need a support system, but it is possible to develop them on a trellis to stop them from propagating. Black and purple raspberries do not send up new shoots out their hill or clump, however, the canes will arch and reach down to the ground surface in which the canes may take root and develop.

Pruning Raspberries

Summer-bearing varieties are pruned after harvest and also in spring. When pruning after harvest, you keep about 12 of the most vigorous new canes, and when utilizing a trellis system, tie them into the trellis. In early spring, remove any canes which have grown out the growing region and some that appear weak. It is possible to force everbearing varieties to produce just 1 crop per year by pruning back the entire raspberry bush through early spring.

See related

List of Summer Flower Bulbs

You might think of bulbs as only appropriate for a spring lawn. After all, spring flower beds are full of tulips, daffodils and crocus. However, lots of flower bulbs blossom profusely from early summer into the autumn. A bulb includes the complete life cycle of the plant in an underground construction. The five types of bulbs comprise: true bulb, corm, rhizome, tuber and tuberous roots.

True Bulbs

True bulbs are included of the basal plate, which grows origins, overlapping fleshy scales surrounding the shoot of the leaves and blossom bud, and lateral buds that grow into bulblets. True bulbs include ornamental onions (Alliums), growing in U.S. Department of Agriculture plant hardiness zones 3 through 9, offering flowers arranged in a ball atop a long stem. Amaryllis (Hippeastrum), which rises in USDA zones 8 through 10, is offered in Christmas times either as bulbs or as blooming plants, but their blooming time in the garden is early summer, with flowers up to 6 inches across in pink, white or red. Asiatic lily (Lilium) rises in USDA zones 1 through 9. Oriental lilies (Lilium) grow in USDA zones 6 through 8. Trumpet lily (Lilium) does well in USDA zones 7 through 10, blooming from early summer through autumn.

Corms

Freesia (Freesia) rises from corms in USDA zones 9 through 11 in late spring, where they will blossom in summer if planted late enough. Gladiolus (Gladiolus) does well in USDA zones 7 through 10. They are frost tender, so need to be lifted and stored over the winter. The plants possess strap-like leaves in two to three feet long and flowers blossom in yellow, orange, red, pink, white shades, a few edged or splashed with a contrasting color. The summer-blooming “Black Jack” gladiolus is actually a very dark red and lends a stunning focal point to the garden.

Rhizomes

Calla lilies (Zantedeschia), which grow from rhizomes, are not true lilies. The blossom is formed from one spathe, a large bract wrapped across the yellow spadix , a spike that holds the genuine tiny flowers. Calla lilies blossom in USDA zones 7 through 10 in white, pink and yellow. Canna (Canna) grow from 3 to 5 feet with large oval leaves that unwrap around a central stem in USDA zones 8 through 11. The blooms are borne at the top of the stem and also resemble ruffled orchids, while leaves may be variegated with burgundy, yellow, red and purple on green. Butterfly ginger (Hedychium), is native to Asia, India and the Himalayas. It rises to 7 feet tall in USDA zones 8 through 10. The flowers bloom in white, red or yellow and resemble an orchid.

Tubers and Tuberous Roots

Tuberous begonias (Begonia x tuberhybrida) keep flowers up to 2 inches in diameter in bright red, pink, yellow, orange and whit and glossy green rouonded leaves. Begonias are hardy down to USDA zone 3. Daylilies (Hemerocallis) possess lily-shaped flowers in a plethora of colors blooming in USDA zones 3 through 10. The wild orange daylilies are frequently seen naturalized near roadsides and in meadows. Water lilies (Nymphaea) are either hardy, which means they will live throughout the winter provided that the pond doesn’t freeze through, or tropical, which means they have to be lifted while the temperature drops below 55 degrees Fahrenheit and saved via a chilly winter. Dahlias (Dahlia) grow in tuberous roots down to zone 7b if heavily mulched, bering flowers that vary from two to three inches across around 6 inches. “Figaro” is a dwarf dahlia growing to 12 inches high and wide with smaller flowers.

See related

Red Flowers That Bloom in Bunches

Red blossoms blossom in bunches delight the eye with their multiple bright blossoms. Lots of plants fit this description — too many to list — but specific crimson blossoms would be easiest to grow. If you would like a monochromatic color scheme for your flower garden, plant mainly red flowers with shades of pink. To make an analogous color scheme, plant red flowers and those who have red-violet and red-orange flowers. To style a complementary color scheme, plant red blossoms with plants which have lush green leaf.

Tall With Bronze Leaves

Cherry-red types of summer phlox (Phlox paniculata) kind hydrangea-like clusters of blossoms and include “Starfire” and “Lord Clayton.” “Starfire” rises 31 to 35 inches tall, flowers in midsummer, late summer or early autumn and has bronze-red leaves. “Lord Clayton” rises 23 to 29 inches tall, flowers in mid- to late summer and has leaves which start deep purple using lime-green veins which mature to a bronzy purple-green. Both varieties attract butterflies and develop in U.S. Department of Agriculture plant hardiness zones 3 through 9.

Large Flowers

Dwarf Asiatic lilies (Lilium spp.) That bear bunches of big, upfacing, red blooms in bunches include “Crimson Pixie” and “Tiny Hope.” “Crimson Pixie” blooms with red blooms in early to midsummer atop stems 12 to 16 inches tall, grows well in containers and makes an excellent cut flower. “Tiny Hope” has glowing scarlet red blooms in midsummer atop stems 14 to 16 inches tall and looks wonderful as a border. Both varieties grow in USDA hardiness zones 2 through 9.

Eyes in Contrasting Colors

Some red blossoms that bloom in bunches feature eyes in a contrasting color. The auricula primrose “Exhibition Red” (Primula pubescens) is an evergreen that produces cranberry-red blossoms with bright yellow eyes in ancient to mid-spring. It grows 6 to 8 inches tall in USDA hardiness zones 2 through 9. A variety of dwarf sweet William (Dianthus barbatus) known as “Barbarini Red” produces deep red blossoms with fuchsia eyes in late spring to early summer, growing 8 to 12 inches tall in USDA zones 2 through 9. Both plants have been rabbit-resistant and create ideal edging in the landscape.

Rock Gardens, Partial Shade

Use red blooms to brighten up your rock garden with moist soil in partial shade. The “GGG Dark Red” number of mossy saxifrage (Saxifraga × arendsii “GGG Dark Red”) bears rosy-red, cup-shaped blossoms in mid-spring to early summer with visible veins in a darker hue of red, and also grows 4 to 8 inches tall. The double English primrose (Primula) “April Rose” blooms with deep ruby-red blossoms in spring and grows 4 to 6 inches tall. All these are evergreens that boom in rock gardens and grow in USDA hardiness zones 4 through 9.

See related

What Is the Difference Between Clump Redbud & Tree Redbud?

Redbuds (Cercis spp.) are exceptionally attractive, spring-blooming trees. A fast plant, redbuds have hundreds of small, bright purple flowers in the early spring, before their leaves appear. The result is plenty of color that completely covers all of the tree branches. Both eastern (C. canadensis) and the southern (C. occidentalis) redbud can develop two basic shapes, equally as a shrub-like clump or in a typical tree form.

Clump Redbud

Eastern and western redbuds are generally native to the eastern portion or the southern and southwestern areas of the USA, respectively. Both types naturally develop as multi-stemmed clumps, with a shrub-like growth habit if left unpruned. Commonly referred to as clump redbud, these plants can achieve a height of 10 or 15 feet at maturity, with the identical spread. They usually develop an irregular silhouette at the crown, with moderate branch density. At the spring, a redbud grown as a clump is basically covered in purple blossoms, with few if any bare branches visible.

Tree Redbud

Redbuds also develop into attractive, graceful trees if pruned properly as young saplings. Since they’re spring bloomers that make flowers on the previous season’s growth, redbuds ought to be pruned and shaped immediately after flowering to make certain flowers the following year. For a multi-trunked tree with a vase-like shape, remove all but three or four principal stalks from a young tree, permitting these to become trunks as the tree grows. If you eliminate all but one stem, then the tree will develop to your single-trunked specimen. However, because redbuds tend to branch aggressively, you must remove new, low-placed branches since they seem to retain one trunk.

Other Features

Redbuds have similar leaves and other characteristics, whether increased as a clump or in a tree form. They’ve very large, bluish-green, heart-shaped leaves. In the autumn, their leaves turn several shades of yellow, and long, flattened, maroon-colored seed pods seem. Redbuds are generally frost tolerant and suitable for civilization in U.S. Department of Agriculture plant hardiness zones 4 through 9 for its eastern canadensis species and 6 through 9 for its southern occidentalis species.

Culture

Tree-form and clump redbuds have generally the same cultural requirements. They do well in full sunlight or partial shade and prefer loamy soil, even though they can tolerate mud or clay if it’s well-drained. Wet locations must be avoided since excessive moisture promotes respiratory diseases. Redbuds are generally easy-to-grow, tolerating drought well and requiring little binder or other special care once established in the landscape. Their branches have thin bark, nevertheless, and any branches that cross or rub against each other should be pruned back, because bark harm can encourage entry of insect pests or diseases.

See related

Are Bananas Perennial?

The perennial banana plant, which is from the genus Musa, grows from underground stems called rhizomes. The herbaceous plant, commonly but erroneously known as a “tree” because of its size — to 25 or more feet tall, has an unusual life cycle. It matures and grows bananas in 10 to 15 months; after yielding bananas that take four to eight months to ripen, the plant dies and is replaced with a different plant that goes through the same life cycle. A banana rhizome can live hundreds of years.

Climate

Bananas are native to tropical and subtropical areas of Asia and need 10 to 15 months of frost-free states to produce a flower stalk. Decorative varieties give a tropical appearance to a landscape. Only the hardiest varieties continue to develop when the temperature drops to 53 F, and fruiting varieties need 10 to 15 weeks of frost-free weather in order to cultivate a flower stalk. The flowering banana (Musa ornate) may develop in U.S. Department of Agriculture (USDA) zone 8. Fruiting varieties grow in USDA zone 9 but don’t produce fruit; they yield bananas, so-called berries, in secure regions of USDA zone 10 and in zone 11.

Life Cycle

Banana stalks, known as pseudostems, are formed by leaves two to 9 feet long that spiral upwards from suckers growing on an underground rhizome. Growers predict these suckers pups. The spiraling leaves wrap around themselves, forming a hollow cylinder. An actual stem rises through the center of the cylinder. When the plant matures, a whorled bunch of blossoms grows in the tip of the stem. After the blossoms yield bananas, which develop in bunches called hands, the stalk dies and is replaced with another sucker growing in the rhizome.

Propagation

Cultivated bananas don’t have seeds. Exactly what were once seeds seem as small, brown specks from the faintly pithy or marginally hollow center of overripe bananas. Varieties of wild bananas have little flesh on their fruit, but they’ve tough, curved or angular black seeds in 1/8 into 5/8 inch broad. Growers propagate seedless domestic cultivars in the limbs that develop in their perennial rhizomes.

Rhizome Management

Banana growers usually allow one plant to acquire a six- to eight-month head start on its growth cycle prior to choosing the most effective of the remaining shoots on its rhizome to replace it and lift bananas. They prune the other, weaker shoots. After a plant matures and yields bananas, then they cut its stalk into the floor and chop it for use as mulch.

See related

The way to Prune Tree Roots to Stimulate Growth

When done properly, pruning roots might help stimulate a tree growth and drive it into bloom. It can also boost the quality of the harvest on some fruit trees. However, not all trees manage root pruning well. Stick to fruit trees and ornamentals like dogwood (Cornus florida), that rises in U.S. Department of Agriculture plant hardiness zones 5 through 9. Pruning tree roots can have catastrophic impacts on the health of the tree, so plan carefully prior to cutting the roots.

Gauge the width of the trunk at a height of about halfway in the ground to the first branch. Multiply that diameter by 5 and that number is how far out from the tree you should prune the roots. For example, if the tree contains a 20-inch trunk diameter, then measure out 100 inches in the trunk base.

Wait until the tree is ready for root pruning. In ornamental and fruit trees, this is often as soon as the existing blooms become well established and the tree is healthy enough to resist root pruning. This can cause some blooms to drop, but many will reappear as the tree goes to high gear to repair the root system. For young hardwoods which are not growing as quickly as you think they need to, wait to prune until mid-summer once the tree is fully leafed out; the leaves might help supply nutrients to support the tree while the root system redevelops.

Use a shovel to dig the dirt to find the root locations at the correct distance in the tree. Look for big roots extending out from the trunk base and follow a straight line out from the trunk for the very best results, but hidden origins can grow in almost any way. Most roots remain within 12 inches of the surface, so there is no need to dig deeper than that when you’re looking for roots.

Dig a hole big a few inches wider than the origin to provide you with room to work.

Shut the blades of big branch loppers across the root and compress sharply to cut through the origin. Repeat if required to chop all of the way through the origin. Massive loppers can usually cut roots around 3 inches in diameter, which is about the maximum size you should prune; cutting larger roots can result in an unstable tree which starts to fall or lean.

Prune a few roots on all sides of the tree, spacing them out evenly. Pruning on one side just can shock the tree, causing the side to begin to perish. Cutting the ideal number of roots can help improve the tree fruit or bloom production, but cutting a lot of can kill the tree. According to the Michigan State University Extension office, then you can prune around 60 percent of the roots to help promote bloom and fruit production.

Replace the dirt above the cut root. Don’t deal with the root using a product designed to encourage healing, as the root should begin to sprout out in the cut.

Water the tree with a deep, bald watering daily for about two weeks to make it easier for your tree to recover from the root pruning and give the tree that the moisture it needs to grow blooms and fruit.

See related

How to correct the pH in Water for Plants

Whether you’re growing plants hydroponically — which is, with the roots immersed in water — or in land, the pH of the growing medium round the plants is essential for ideal development. The pH of the growing medium could be acidic, alkaline or basic, or neutral; normally, plants prosper with a pH of about 5.5 to 6.5. Underneath that, plants are acidic, and above that, they are alkaline or basic. If you have discovered that the pH of the growing medium is out of whack, you may use quite a few different methods to fix the problem.

Insert the nutrients or fertilizers which you’re now using for your garden. If you’re growing hydroponically, wait about one hour before you move on to another step. If you’re growing in dirt, wait for 24 hours.

Test the growing medium by inserting a pH test strip or electronic test kit into it, following the directions on the evaluation kit to ensure proper testing. Read your pH level and compare this to the perfect pH for the type of plant you’re growing to ascertain whether you have to raise or lower the pH of the growing medium.

Fill a gallon jug with clean water. Depending on the material you’re using to adjust your pH, then you might be instructed to use a different quantity of water. Make sure you read the directions on the bottle or talk to the retailer for instructions on the proper water-to-substance mix.

Add lime, wood ash or a specially formulated solution into the water to boost the pH, or add sulfur, phosphoric acid or a pH-lowering solution decrease the pH. If you’re adding solid materials to a liquid solution, enable the substance to soak in the water for a couple hours to allow it to “steep.”

Water your crops using the solution. If you’re growing in dirt or another solid like perlite, water the plants using the solution in the same manner you would water the plants using frequent water. If you’re growing hydroponically, add the solution to your hydroponic solution.

Test the pH again following the therapy, to ascertain whether you have to do another therapy. For hydroponics, wait about 30 minutes to check the pH again. For dirt and other solids, wait about 24 hours.

See related

Does a Pineapple Grow Best in Sand, Soil or Water?

Pineapples grow well in warm climates, as they are indigenous to South America. Cold weather, 32 degrees Fahrenheit or lower, can damage or freeze the plant. Pineapples are grown as a commercial crop in Hawaii, but develop in different areas in U.S. Department of Agriculture plant hardiness zones 9 though 11, and indoors in cooler climates. To develop well, pineapples have certain soil requirements.

The very best Soil

Pineapples need well-drained soil since it is impossible for them to withstand a waterlogged growing medium. Because of this, the ideal soil for growing pineapples is a sandy loam, since mud allows for fast isolating, or water movement, through the soil. Even though pineapples dislike waterlogged soil, they’re drought-tolerant, but need even moisture for proper fruit growth. Pineapples generally need about 1 inch of water per week, through rainfall or supplemental watering.

Soil for Indoor Pineapples

Pineapples grown indoors desire a potting mix of light, sandy loam as well. It is possible to use a potting mix containing two parts humus, 1 part sand and 2 parts soil. Because drainage is essential for pineapple development, the ideal container is also important. Clay containers are a fantastic alternative for growing pineapples. The container must have drainage holes and a layer of pebbles or shards of clay pot on the bottom to help with proper drainage.

Other Soil Requirements

Pineapples need a neutral to mildly acidic pH, ranging from 4.5 to 6.5. Soils that are too alkaline require a sulfur therapy to reduce the pH. The plants need nitrogen to get proper fruit growth, so you need to feed the pineapple with a balanced fertilizer every two to three months. For indoor pineapples, feed plants using a foliar spray fertilizer twice a month during the active growth period. Throughout winter, when growth slows, only feed crops once a month.

Water for Pineapple Rooting

When spreading pineapples, you can use water to root the pineapple top. Remove the top of a pineapple that has a healthy, leafy shirt, cutting about 1/2 inch under the leaf clusters. Then, cut away the outer part of the pineapple top’s flesh, which leaves the leafy shirt and a stringy core. Remove all of the leaves except for five to 10 of the largest leaves. Using toothpicks, place the top into a glass of water to root — approximately 1/2 inch deep.

See related

How to Graft a Weeping Standard Rose

A weeping conventional rose has an strong erect stem with a spreading, cascading rose variety grafted to the top of it. Generally multiflora roses are used for your own rootstock. Any low-growing spreading rose can be utilized for your own scion, or leading part. In addition to the usual rose diseases and insects, the conventional rose can get sunscald on the exposed stem. It is also more likely to split strong winds because the graft union is so high above the ground. Grafting should be performed in winter, while both rootstock and scion are dormant.

Propagate the rootstock by cutting a large stem of an erect multiflora rose and sticking it in loose, fertile soil until roots are formed. Let it grow to the desired height, pruning off side branches as they develop. The rootstock must be 2 to 5 feet tall, depending on how tall you want the conventional rose to be.

Select a low-growing spreading rose number that you prefer for your scion. Cut healthy parts of cane which grew in the prior season. Search for scion wood one-quarter to three-quarter inches in diameter with chubby, well-spaced buds. Set them in a labeled plastic bag.

Cut the rootstock off perpendicular to the cane at the desired height. Use sharp clippers to make a clean cut.

Split the rootstock down 2 to 4 inches in the cut having a grafting knife. Be careful to make the split in the center of the rootstock. Hold the slit open with a wedge.

Cut 2 sections of scion, 4 to 6 inches in length, which contain 3 to 4 buds on the upper portion. Reduce the lower edge of the scion stick with gradually sloping cuts exactly opposite each other; the angle of the seams must match the angle of the wedge as tightly as possible.

Insert the scion sticks into each side of the slit from the rootstocks so that the cambium — the delicate line between the bark and the wood — of the rootstock and the cambium of the outer edge of the scion is matched exactly.

Remove the wedge holding the slit open. Cover the entire ending of the rootstock and the slit with grafting wax to prevent dessication.

Remove the less vigorous scion after growth resumes in the spring. Both scions can be permitted to grow for a month or so, but complete healing will not occur if both are left in position for the entire growing season.

See related

What Palm to Plant on a Fence

There is something about the shape of a palm tree along with its delicate, feathery fronds that invokes the tropics. If your landscape includes a fence, you might plant one or more palms along it to include a tropical touch. Deciding on the best variety for your individual type of fence and selecting one well-suited for your climate are important steps to help succeed.

Tall Fences

Massive hands with sole straight trunks and high, full canopies could be excellent choices planted near a tall fence, either separately or within a row. The American oil palm (Attalea cohune,) also referred to as the cohune palm, is a stunning tree that operates in this type of location. It reaches a full height of up to 50 feet, using a massive crown of dark-green, feather-shaped leaves, and is suitable for U.S. Department of Agriculture hardiness zones 9 through 12. The Canary Island date palm (Phoenix canariensis) is another attractive tall hand, reaching a height of up to 60 feet, using a thick trunk covered with diamond-shaped designs and a crown of 50 arching leaves. It does best in USDA zones 9 through 11.

Palms for Privacy

Planting short palms along a picket-type fence, especially one with large spaces between pickets or slats, can provide a feeling of safety and privacy. The European fan palm (Chamaerops humilis) rises well in USDA zones 8 through 11, creating clumps that could reach a height of 15 feet at maturity. Its relatively short trunk and dense layer of triangular, fan-shaped fronds make the tree an appealing and effective privacy screen. The pygmy date palm (Phoenix reclinata) also works well against a short, open-slatted fence. It has multiple, blunt stems that are covered with loose brown fiber and support crowns of green to yellow, feathery fronds up to 15 feet long. It’s best suited for USDA zones 9 through 11.

Border Fencing

A number of small hands do nicely planted in rows along a short fence, by way of example, from the rear area of a fenced edge. The metallic palm (Chamaedorea metallica), also referred to as the miniature fishtail palm, has blue-green, metallic-appearing foliage that is unusual because the leaves are not divided into leaflets. Naturally tolerant of low light, these palms are about 3 feet tall and suited for USDA zones 9 through 12. Yet another dwarf-sized plant, the blue-stem palm (Sabal minor) is also well-suited as an accent along a short border fence. Suitable for USDA zones 8 through 10, it creates bluish-green fans over a short trunk, reaches a height of 2 or 3 feet complete and prefers partial sun or light shade.

Hot Spots

Some fenced places are subject to unusually high heat, either because the fence includes heat-retaining metal or has a southern exposure. Even though most palms are humidity-loving plants that don’t tolerate extreme heat, several do well in landscape warm spots. For example, the Mexican blue hand (Brahea armata) is a desert tree using fan-shaped circular leaves topping a thick trunk. It may attain a mature height of 50 feet, tolerates rough, rocky soils and protracted periods of heat and drought, and is suited for USDA hardiness zones 8 through 11. The windmill palm (Trachycarpus fortunei), also referred to as Chusan palm, is a compact, extremely heat-tolerant tree with a slender stem along with a full crown of feathery fronds. It rises slowly to about 15 feet and does well in USDA zones 7 through 10.

See related