Flowers That Bloom Times

You can find only one time a yr, lots of flowers that grace you with their elegance. These flowers may bloom for several weeks or several months, but the show’s over for the year once the blooms are gone. There are, nevertheless, even through the year and some flowers that bloom frequently throughout the period. With the best conditions as well as care, these flowers might bloom three or two times a yr or constantly throughout the period. Repeat bloomers are usually more satisfying, considering the time and interest they need, though all flowers have elegance.

Bougainvillea

A fast growing, flowering shrub, bougainvillea (Bougainvillea spp.) creates colourful blooms throughout the growing season and periodically through the duration of the dormancy period. Reaching heights that are mature to 30-feet or even more, the bougainvillea genus consists of of around 18 species. These shrubs that are adaptable are tolerant to drought and almost all all well-drained soil surroundings. Bougainvillea grows well in complete and partly shaded surroundings and is hardy in Sunset’s Environment Zones 5, 6, 12 through 17, and 21 through 24. Resistant to fungal and bacterial illnesses, bougainvillea is frequently pestered by insects, like mealy bugs, white flies and aphids.

Gardenia

Hardy in Sunset’s Environment Zones 7 through 9, 12 through 16, and 18 through 24, the gardenia (Gardenia jasminoides) is an adaptable, repeat bloomer that grows well in planted and potted surroundings. Tolerant to large pruning, as well as outdoor and indoor surroundings, the gardenia is developed as bonsai, borders and edging, house plants, landscape enhancers and espalier. It creates shiny, dark-green foliage with fragrant flowers that bloom through winter. Though tolerant, gardenia is vulnerable to a number of fungal and bacterial illnesses that contain canker diseases and powdery mildew, root rot.

Daylily

With almost 20 species, daylilies (Hemerocallis spp.) might be deciduous, evergreen or semi-evergreen centered on their climate and atmosphere. Thriving in full sunlight and well-drained soils, these vigorously-growing, cool-tolerant crops are hardy in Sunset’s Environment Zones 1 through 2 4. Daylilies spaths, or create lengthy stalks and increase in clumping kind. The spaths create several shortterm blossoms per season with each 2 4 hrs or less. Rejuvenating, daylilies therefore are resistant to illness and pests and react properly to large pruning.
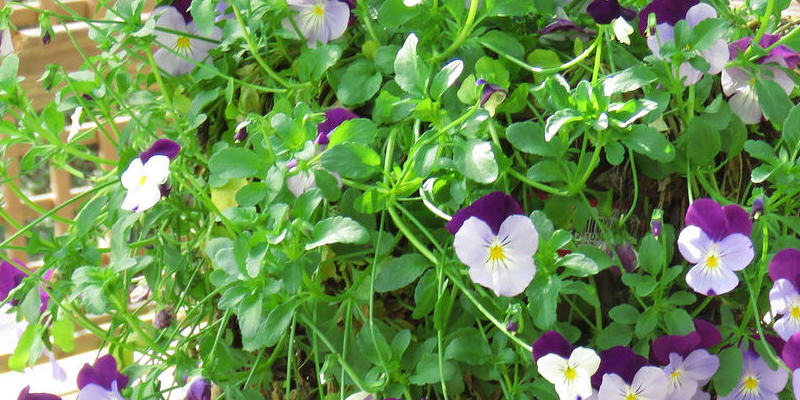
African Daisies

Ranging in colours from whites and yellows to pinks and purples, African daisies (Osteospermums) are steady bloomers that supply flowers from planting season through late drop. These bloomers that are showy develop best-in fertile, well-drained soils that obtain lots of total, sunlight. Daisies are drought-tolerant flowers that develop in clumping formations. Ideal for baskets, ground-cover, borders and gardens, white-flies are fairly resistant to illnesses but often pester African daisies.

See related

The best way to Detect a Roof Leak

A roof leak in just about any real estate home can make the qualities that are most useful un-sellable. They’re hard to to find; several instances where the real issue is, where the roof leaks isn’t. Structural injury does occur over time in case a roof leak fixed and isn’t identified, and partitions and ceilings might become moldy and discolored. Fixing and detecting a roof leak is paramount for just about any home listed on the industry to avoid injury also to keep the house in a sellable state.

Whether there is a roof leak, determine. Look for mildew or mould or on partitions. Look on drywall or ceiling tiles. Look for wood around chimneys or additions, in crawl spaces, including vents and skylights.

Water down the roof with fresh-water from a hose or both buckets. This can be called a flood check. It’s going to begin to leak, when the roof becomes saturated.

Add a pigment like food coloring or dye. A vibrant colour like red will be simple to trace and find out. The water will carry this pigment through the leaking location plus it is going to act as a beacon showing you the the particular level where the water is coming in.

Check the attic for locations that are dyed. Follow the route that is dye from where it starts to where it happens to discover the leak. There could be several points of entry, when you learn one stage, continue till you’re pleased that there are no further leaks to research carefully.

See related

Planting Suggestions to get a Tomato Tower

Urban gardeners are often challenged to use tiny areas for crops that were developing. Modern back yards are restricted in dimensions, and condo-dwellers backyard in balconies and patios. Where ample room is accessible, effective use of soil, water, shade as well as other sources make heading vertical with crops recommended. Tomato towers also known as tomato cages, provide options that are developing that are easily accessible to to teach tomatoes therefore they occupy a restricted footprint, and clambering crops upwards.

Kinds of Tomato Towers

Tomato towers are typically designed with with fencing, wiring or concrete – will be created at house or bought and reinforcing mesh. The aboveground part is set to the soil stakes, posts, by legs or other anchoring products. Other supplies used for building are PVC pipes, wood, plastic, wire cattle or hog panels and re-bar. Towers that are purchased come in various heights and diameters. Cages may be personalized to personal circumstances. Regardless of the substance, a great tomato tower provides strong support for accessibility for harvest, good air circulation, and crops. Transportability and reusability are advantages.

Tomato Crops

Any type of tomato could be developed efficiently in tomato towers, provided the construction is strong and suitable for the size of the plant. The crops improve coverage to sunlight and may be fixed to the assistance most of the way across the diameter of the tower. Tomatoes that do properly in the Environment Zones of Sunset 1 5 through 1-7 prosper in great summer climate and attain bearing dimensions rapidly. Examples of types that are suitable contain tomatoes that are traditional Elegance, Carmello, Green Stupice and Zebra, beef steak tomatoes like Paul Robeson and Black Krim, paste tomatoes Mamma Leone and San Marzano, and tomatoes Black-Cherry, Sungold, and Golden Sweet.

Vegetable Crops

Besides tomatoes, increase early crops like peas, sugar peas and snow peas. Sow seeds across the exterior of a tomato tower. Summer climbers like beans, melons, cucumbers, gourds, and chayote are candidates for tomato towers that are taller. Support weightier fruits by utilizing slings of re-cycled or cheese cloth pantyhose tied onto the tower construction.

Ornamental Plantings

Non-rampant climbing, flowering crops are excellent topics for tomato tower supports. Some illustrations are sweet peas (Lathyrus odoratus), passion flower (Passiflora species), star jasmine (Trachelospermum jasminoides), pink allemanda (Mandevilla splendens), nasturtium (Tropaeolum majus), kinds of clematis, jasmine nightshade (Solanum jasminoides), lilac vine (Hardenbergia violacea) and black-eye d Susan vine (Thunbergia alata). Fast-developing climbers like honeysuckle (Lonicera) and morning-glory (Ipomaea) require regular pruning if developed on tomato towers.

Container Plantings

Put tomatoes in to 7- 1 or gallon -gallon containers outfitted using a tomato tower. Grow them outside for the summer and fall and b-ring them inside to greenhouse or a sunporch before freezing climate for ongoing creation. Combine flowering and edible crops for patio topics and attractive balcony. Allow snowpeas with rose and burgundy flowers and crisp sweet pods to climb the tomato tower and white candytuft (Iberis sempervirens) or sweet alyssum (Lobularia maritima) to offer fragrance as well as a cover for s Oil below the pea vines. Preserve tender vining tropicals like Gloriosa lily (Gloriosa superba) by planting tubers in a decorative pot by having an appropriately-sized tomato tower. Eliminate the tower when the vine goes deciduous and make the pot for over-wintering.

See related

Tut Plant Care

The background of the King Tut plant (Cyperus papyrus “King Tut”) dates back to the ancient Egyptians, who used elements of the plant to produce paper. This tall, unique-looking sedge will include a look to any backyard or pond that is little. Its reduced-upkeep account and hardiness in a broad array of Sunset zones, from 17 to 26, are among the factors the Tut plant won top scores from gardens such as the Mast Arboretum and colleges including Oklahoma State.

Plant Characteristics

Although other papyrus crops can increase to up to 15 feet, the King Tut cultivar is a “dwarf” selection that matures to 5 or 6 feet tall. Part of the grass family has big heads of medium- ray – leaves perched atop strong stems. Greenish- clusters of flowers appear through the summer months in the ends of the rays, as well as the flowers create brown, nutlike fruits.

Uses

King Tut crops perform well in many different landscapes, including normal backyard beds, ponds and containers that are huge, together with the exception of hanging pots. Although these grasses are water-loving crops, they perform properly in typical and wet soils, and well-established programs may also tolerate drier conditions. Use these in perennial, Japanese or bog gardens, keeping in mind they tend to clump together and crowd out other crops if not provided enough room to grow.

Normal Plant-Care

Your King Tut crops will require a reasonable quantity of gentle natural fertilizer that is well-balanced, using a soil pH from 6 to 8. Areas of your lawn with around six hours of sunlight a day and shade the remaining day are the most useful places. In the event the plant gets too dry, a few of the stems will kink over and maybe not keep the soil moist to damp straighten back-up, and you also might need to reduce them off. The crops prosper in standing water, that’s the reason why they are excellent for pond locations as well as in defectively drained soils.

Winter Care

They might not endure prolonged freezing temperatures although Tut crops are relatively hardy perennials. By transferring the crops to pots near a bright window in a great — 6 to 6-5 levels F — area it’s possible for you to overwinter the King Tut plant in-doors to avoid injury. Keep the plant well-watered. Spot a container stuffed with water beneath the the pot to keep the plant from blow drying, in the event that you use a pot with holes in the bottom. You once the grass turns brown, remove them instantly or in the spring, and can also handle these crops as annuals.

See related

Perennial African Daisies

There’s a place in every backyard for the cheery South African natives identified as perennial African daisies (Osteospermum). Innumerable types exist with colours ranging from whites and creams to blues, purples and mauve. The same daisies, planted en-masse, bloom with fragile grace from patio baskets with non-chalant extravagance along path and California freeways. Daisies that are perennial prosper in the Environment Zones of Sunset 8, 9 and 12 the array is expanded by some kinds.

Freeway Daisy

The free Way, or trailing, African daisy (O. fruticosum) produces dark lavender daisies, with darker facilities, on plants 6 to 12″ tall. Plants stems, covering a 2- to 4 foot patch of backyard in flowering splendor during cool seasons, blooming most useful in a year. Taller hybrids contain the purple-flowered “African Queen” and “Burgundy.” “Whirlygig” has blue and white flowers, and “Seaside” is white and light-pink. Salt- and drought-tolerant free Way daisies consider ocean breezes in stride.

Symphony Collection

Symphony series (O. Symphony series) crops are quick growers, forming 3-foot-wide clumps of compact, evergreen foliage up to 8″ large. Symphony sequence African daisies tolerate heat better than other daisies, increasing the cycle to contain large flowering throughout seasons, as well as in great climate. The cheery daisies, with dark-blue facilities, come in several named types, including “Cream Symphony,” “Lemon Symphony” and “Orange Symphony.” These colorful bloomers execute undeterred by drought or salty ocean air.

Blue and White Daisybush

Blue and white daisy bushes (O. ecklonis) generally increase significantly taller than other kinds, with crops as large as 5 feet tall. Long-stemmed flowers go above above 4 foot- clumps of bushy. Coloration, with white, lavender-blue-backed rays radiating from dark blue facilities, marks the species. “Lavender Mist” blooms from spring through fall and is particularly cold-tolerant. Compact Serenity collection crops bloom through the seasons, their cream-coloured flowers displaying purple- deep facilities, ringed. Passion Blend types are compact growers with sky-blue-centered white, purple or pink flowers.

Award-Winning African Daisies

O. jucundum African daisies acquired the Royal Horticultural Society’s Award of Garden Merit. Rooting stems up to 20-inches large and spread to to create clumps 2 to 3-feet across. Purple-centered, 2 inch flowers differ in colour. If deadheaded, plants bloom in spring and fall, and through the duration of the latest months. “Langtrees” shows purple-pink rays and sunny yellow facilities. Cold-tolerant “Purple Mountain” (O. jucundum compactum) succeeds in Sunset’s Environment Zones 2-B through 2-4. Bright -purple daisies dance through mid-summer above clumps in spring, repeating their show in drop.

See related

The best way to Build Closet Shelving Without Wall Studs

Shelves are typically anchored to the wall where wall studs can be grabbed by the screws. If you can`t find studs, or in case your wall doesn`t have any, you can nevertheless build closet shelves. However, screwing shelving brackets through slender dry wall might ultimately trigger the shelf to drop because dry wall can`t help the fat. Paneling or thick plaster partitions may bury studs also deep, creating the studs inaccessible. In case your walls are masonry, you probably don`t have studs in any way. You will require techniques and the appropriate components to create a stud- closet shelf. It is possible to design shelving to fit your needs using the same techniques, after installing one shelf.

Where you want a shelf measure left to right on the other side of the region.

Choose the kind of bolts required for the wall. As an example, in the event the wall is plaster, dry wall or paneling, use toggle bolts or bolts. Molly bolts are bolts as you tighten the bolt using a sleeve that increase behind the wall. Bolts have a butterfly- toggle that tightens and opens from the back side of the wall as you tighten the bolt. Use screws in the event the wall is masonry, including brick or block. The heads should be big enough to avoid the screws, although bolts or screws should be small enough brackets.

Determine brackets you require. At minimal, use one bracket about 6″ in from every end of the shelf. Include one bracket in the middle or brackets spaced in the event the shelf is going to be very lengthy.

Measure one edge of a bit of 1 inch by 12-inch medium-density fiber-board or shelving board that is laminated to the shelf size measurement. Mark the edge of the board using a pencil.

Set a carpenter`s square on the board using the quick lip of the square contrary to the edge as well as the 90-diploma corner of the square in the pencil mark. Trace the fringe of of the square throughout the board, producing a-line straight-out in the pencil mark.

Cut the shelf board across in the line, using a round saw.

Place A4-foot le Vel horizontally from the closet wall in the peak. Adjust one end-of the le Vel before the bubble is centered, then t-Race the fringe of of the le Vel on the wall. Mark where each shelf bracket is likely to be installed.

Align the fringe of of one shelf bracket together with the level pencil line. One leg of the bracket ought to be pointing downward and flat contrary to the wall; the leg of the bracket should stage outward that is straight. Trace all the screw-holes in the bracket on the wall, utilizing a pencil. Repeat for every single bracket.

Drill a hole through the wall a-T every mark. Use an Savannah electrical drill having a drill bit this is the sam-e diameter as your bolts. In case your partitions are plaster, dry wall or paneling, use a drill bit that is typical. Use a masonry drillbit in the event the wall is masonry.

Set one bracket from the wall. Align the hole openings together with the proper holes in the wall.

Slip one screw through one of the screw-holes in the bracket and to the holeinthewall or bolt. Tighten it having a Phillips screw-driver bit as well as a power drill. Slip the sleeve and bolt device through the opening. For bolts, squeeze the butter-Fly wings and slip the bolt. Fasten the bolts in every single bracket.

Sand the cut ends by-hand with great- sandpaper or a sanding sponge, if essential.

Place the shelf.

See related

The best way to Tint Panes

Tinting your windows is a a powerful way to solution to reduce the harsh rays of the sun and keep your house cooler in warm summer months. Many houses, particularly those in places know for severe climate, have twin-pane windows. This type of window includes two items of glass. The additional pane gives protection against rain, sleet, snow and winter. That stated, tinting this kind of window needs a movie that is rated “twin-pane risk-free” to avoid any possible harm.

The peak of your window by its own width to look for the part of window tint you may need.

Prepare your solution. Mix four drops of baby shampoo. Pour the solution into a spray bottle that is plastic.

Place a dropcloth underneath the window to protect your flooring. Cover the wall just just beneath the window as well as the window ledge.

Clean the glass of dirt and grime. Wet the glass with answer. Use a straight-razor to scrape off any stickers or paint. Carefully run a refreshing razor on the glass to get cleared of any residue when the glass is clear. Spritz with answer wipe and squeegee bone-dry along with your lint-free paper towels.

Measure your tint movie to to match the dimensions of your window. Allow one-inch of materials that is additional on all sides for possible errors. Cut to size.

Begin at one corner and remove the protecting liner of the film’s.

Spray the whole adhesive aspect of the movie along with your spray that is mounting. It’ll be easier to to put in case the adhesive is completely moist.

Place the adhesive side of the film on placement and your glass.

The movie with squeegee it and mounting remedy, functioning until each of the extra mounting remedy out to the edges in the guts of the film was squeezed out.

Trim the excessive movie by means of your utility knife. Use the straightedge as your manual and reduce each aspect in one easy movement.

Spray the window with squeegee and remedy with strain to eliminate extra answer or any bubbles.

See related

Tips on Mango Tree Maintenance

For those who have created an edible landscape in a frost free location, you could have incorporated a mango tree (Mangifera indica) or two. These natives create a plump kidney shaped fruit with skin that is inedible, with respect to the range, in pale yellow or green, usually marked using a red blush. The peach-like flesh is sweet, juicy and firm. Mango tree servicing is cut down on by providing appropriate circumstances because of its growth.

Site, Soil and Area

Mango trees require a well-draining site in a frost free location that receives a full-day of sunshine. They do well in top or the center of a slope. Loamy Sandy or clay soils are suitable for planting mango; nevertheless, prevent large, moist soils. Mangoes tolerate alkaline soils but prefer a soil pH between 5.5 and 7.5. Allow trees lots of room for his or her canopy. Space trees about 12 to 15 feet away and apart from power lines and trees, structures.

Temperature

Temperatures below 40 degrees Fahrenheit throughout the period that is blooming eliminate flowers and mango fresh fruit. A young tree is likely to be seriously damaged if temperatures fall to 30 degrees Fahrenheit, however a mature tree might withstand the sometimes 25-degree Fahrenheit evening. Protect trees from climate injury with windbreaks, when temperatures threaten to fall, particularly throughout the first two years, and protect them. Keep straw or foam trunk orchard and wraps heating useful to provide protection.

Pruning

A mango tree that is wholesome needs pruning; nevertheless pruning to eliminate handle or injury dimensions might be needed. Pruning in late winter or following the harvest stops reduction of fresh fruit. Pruning trees encourages the development of branches. Call a professional to prune a tree which is more than 30-feet tall.

Harvest

From flowering, ripening fruit, about 100 to 150 times starts to soften and turns the appropriate colour because of its variety. The fresh fruit is ready for harvesting when the conclusion of the fresh fruit facing from the stem fills out. Pick your mangoes or use a lengthy selecting pole, which h AS a ny-lon or canvas bag connected to some metal ring having a blade. If it’s kept around 7 to 75 F for three to eight times slightly good fresh fruit could possibly be ripened in doors.

See related

From Blowing in Vents the best way to Keep Rain

Attic vents keep your house comfortable as well as in excellent situation by enabling humidity and warmth to dissipate to the the outside. Within a rain storm, rain may be blown by winds through the attic vents in your house. This additional moisture fuels the development of mould and mildew causes wood injury and can destroy products that were saved. From blowing in attic vents, keeping rain needs several hours of of energy but might save the expense of costly repair charges to you.

Securing Vents

Loose vent addresses makes it possible for rain to blow to the attic. Use a ladder to gain access to the vent and tighten the screws of the cover using a screwdriver. You might want to include extra screws to to keep the vent protect securely because most handles are connected only in the corners. Use an electric drill to drill one hole in the midpoint of every side of the vent, then use 3/4 inch wood screws to secure the cover.

Flashing

They are strengthened by adding sheetmetal to the seams of your handles and increases their capacity to keep out rain. Select sheetmetal of the same thickness as your vent protect. Cut four pieces of sheet steel to to match the perimeter of the cover, enabling 1-inch of overlap at every corner and every seam. Use a drill as well as sheet-metal screws to secure the sheet-metal flashing to the cover.

Deflectors

Place a deflector on the opening of the vent to keep rain. Deflectors are available in configurations, several sizes and colours to coordinate with your current vent protect. Select a cover manufactured from stainless metal for outside use. Use sheet-metal screws to mount the deflector on the attic vent protect.

Screening and Caulking

Measure width and the length of the attic vent protect. Access the the inner aspect of the attic vent. Cut an item of 0.17-millimeter gauge metal screening somewhat bigger than the dimensions of the attic vent protect. Mount the screening joists utilizing a gun. Use a ladder to eliminate the attic vent protect and use a staple gun to secure the screening to the protect, in the event you CAn’t access the attic inside. Reattach the protect that is vent.

See related