Fantastic Design Plant: Joe Pye Weed

Sometimes we dismiss a great design plant because we’re more used to watching it over the street than at a manicured backyard, or because it has the word”marijuana” in its ordinary name. Joe Pye weed is one such plant. This indigenous, frequently overlooked beauty grows up to 7 feet tall, adds showy purplish blossoms in late summer to early fall and can be quite simple to grow straight out of seeds.

Its colours and textures produce dramatic clusters and draw butterflies to the garden, and Joe Pye weed thrives in those tricky areas where water stands after a storm. Get to know Joe and decide if you’d like him to come over and hang out in your lawn.

Botanical name: Eutrochium purpureum (previously Eupatorium purpureum)

Common title: Joe Pye weed (other, more common, common names include Queen of the Meadow and Snakeroot)

USDA zones: 5-10

Water necessity: Moist. Grows nicely along ponds, wetlands and streams. Soil should be damp.

Light requirement: Full sun to light shade

Mature size: The conventional native plant can grow up to 7 feet tall and 4 ft wide, but you can find dwarf varieties available that grow to about 4 ft high, such as E. purpureum’Little Joe.’

Tolerances: Requires damp soil; can withstand hot full sun

Seasonal attention: This native plant is a late bloomer, with large, showy purple-mauve-ish blossoms. Its blossoms will continue into early fall.

Best time to plant: Fall. Joe Pye weed can be grown quite easily from seed, or even out of container crops, which are easily available in nurseries.

Interesting fact: Joe Pye weed is an herb that was mainly used medicinally for many years; some believed it inoculated individuals against poisons. One legend has it that the plant is named after a Native American called Joe Pye, who used it to heal typhus.

Barbara Pintozzi

Distinguishing attributes: Joe Pye weed (seen here amid purple coneflower) includes a wonderful all-natural appearance; it’s a native plant we frequently see in the end of wetlands or drainage ditches on the side of the street. The flowers form large clusters that have a general domed shape.

Joe Pye weed attracts hummingbirds, bees and butterflies, which will add much more life and color to your backyard.

Milieu Design

The best way to use itChoreographing fall bloomers can be complicated. But when you plant clusters of Joe Pye weed from the perennial mix, in border gardens and along wet locations, you will make certain to receive a burst of purple in late summer or early fall.

The plant’s soft colours coordinate with a wide array of foliage and blossoms, whether it be the yellows of Black-eyed Susans or goldenrod, additional colors of purple from fall-blooming asters and mums, or even a gray-green background of blue spruce. You might also want to use it with other butterfly-attracting plants like butterfly bush, coneflower or lantana.

Liquidscapes

Planting notes: There are several simple methods to plant Joe Pye weed.
Start seeds indoors in late spring and then transplant them outside in the late summer or early fall. Directly plant seeds into the soil in the fall. Purchase container plants in the nursery and plant them at the fall.If you plant out of containers, make sure that the soil never dries out for more than a day or two. Since each plant can get very large, look at the seed package or plant label to determine how much space to leave between crops.

Keep the soil damp, especially for the month following planting. You may split Joe Pye weed every couple of years. Cut the plants back to about 6 inches from the spring. To create your crops shorter and fuller, pinch them back into the early summer.

Watch more guides to good design plants

See related

To Set Your Tub

Putting your tub in the shower might be an unexpected idea, but it is a strong one and a growing trend in bathroom design.

Sure, it looks fantastic, but what does it mean from a practical standpoint? For one, children (and grown-ups) can dash all they want in the tub without having to be concerned about water damage or a mess. Two, the ideal tub model can double as a fantastic shower seat or spot to perch your leg while shaving.

Curious if that will work in your new bathroom? Take a look at these examples and find out what questions to ask your contractor prior to implementing this layout.

Stephenson Design Collective

Waterproofing is essential in these installations. Your tub is going to have a 11/2- to-2-inch drain line which will need to travel throughout your bathtub’s waterproofing materials.

Tubs in general are awkward and also a hassle to hook up, therefore there are a great deal of factors to consider here. For example: Will your bathtub’s anti-tipping mounts poke through your shower membrane? This is a good question to ask your own builder.

Sean O’Brien Architecture

If this modern tub were a tub shower, then it’d be quite hard to watertight because it’s designed as an undermount tub. Clean-lined tubs like this typically don’t have edging that connects the tub with all the wall’s safety. Placing the tub within the shower means the whole area is waterproofed, and it actually simplifies the room’s design.

Tip: A typical bathtub’s glass door and fixed panels may cost up to $2,000. I like how this shower-tub combination has a single wall panel without a door. A simple design change like this can dramatically decrease the price of your new toilet.

John Lum Architecture, Inc.. AIA

Some tubs are a struggle to get into for individuals with knee or hip issues. If that is true for you but you still want a tub, a combination like the one displayed here will assist with accessibility. This barrier-free shower lets for a tub, but the bathtub itself may still be used for years and years to come.

Tip: If you plan to clean your children in the tub, place the shower fittings so they may be used in both the tub and the shower to make items easier.

John Lum Architecture, Inc.. AIA

A built-in tub like this is really much easier to install than a freestanding one. Waterproofing supporting and behind tubs with little wiggle room can be challenging, so I suggest that clients install tubs like this, for practicality and cost savings.

Tip: Make sure your walls are waterproofed up to a height of 6 ft in your shower and tub area’s main wet zone. Waterproof the walls at least 18 inches above the tub lip in a tub with no showerhead.

There is lots to love about this particular shower. For starters, the very small ledge across the wall on the right is a fantastic way to adapt a smaller tub in a larger area, while adding extra storage.

The ground outside the tub is really graded back into the shower, therefore everything drains with ease. This is an actual wet area, and it looks great.

KADE Restoration

This bathroom’s design would have made fitting in a single dedicated shower difficult, but the bathtub was designed to serve as a walk-through into the tub. This enables the homeowner to have both a tub and a shower without combining both into a small space or squishing a bathtub into one corner and the tub into the other.

Dotter & Solfjeld Architecture + Design

As beautiful as this design option looks, there are loads of risks — particularly with waterproofing — so make sure you discuss something like this in detail with your contractor or builder. There are several ways to design a beautiful shower with a characteristic tub, however there are very few approaches to properly waterproof this particular setup. Be certain to understand all of the pros and cons prior to proceeding with your job.

Tip: Products like Noble Company’s NobleSeal TS and NobleSealant 150 are exceptional materials for seaming these difficult spots. If your bathtub layout will have a tub waste line and a tub filler which penetrates the bathtub’s waterproofing, these parts of the installation ought to be done prior to your contractor does a flood evaluation.

Inform us Would you set your tub in the shower?

More: How to convert your tub space to some shower

See related

Utility Fabrics That Move the DIY Distance

Linen, muslin, fall fabric and duck cloth are all inexpensive and versatile options that can help you revamp a room. Since these materials are usually neutral in color, are durable and can be located at many cloth, craft and hardware stores, they are fantastic for DIY jobs. Maintain several yards of your favorite cosmetics cloth on hand, and you will always be prepared when an idea presents itself.

Linen

Most utility cloths have a rougher texture, which is great for decorators and designers that are looking to add textural interest to a room. This rough linen bedding has a French-countryside feel.

Rough Linen

Linen delivers a lovely way to add a timeless touch to jobs and crafts. Fine linen can be pricey, but you can also find less expensive linen that works well for many home jobs. It’s very durable and ready to wick moisture, but it is also a material that readily wrinkles.

Try linen on your mattress for a gentle and inviting duvet cover. Its natural fibers make it a healthy and comfortable fabric choice.

Yvonne McFadden LLC

Upholster a headboard or pay part of a wall with linen to revamp a bedroom with an elegant focal point. A upholstery brads refines the appearance.

Jenn Hannotte / Hannotte Interiors

Muslin

Fashion designers usually cut their garments from muslin for a test drive before they sew their final pieces. Muslin is affordable and frequently gets lost. However, there’s beauty in this inexpensive cloth — the natural color gives it a vintage quality without the vintage price. It dyes well and is soft and comfy, lightweight, simple to sew and exceptionally versatile.

As seen with this ruffled shower curtain, muslin is excellent for all sorts of home DIY jobs. It’s a neutral base that can be enhanced with paint, dye, stitched details or rubberized.

Whimages

Fall Fabric

Drop fabric is similar in color and texture to muslin and is also very inexpensive. Muslin can be discovered at any fabric shop, while fall cloth can be purchased at a home improvement or paint shop. It’s a lot thicker and stiffer than muslin, therefore it is not the best choice for jobs with little details. Nonetheless, it’s water resistant, and its durability is a shield against rips and tears. Use it outside for backyard and patio DIY jobs, like this draped color on a gazebo .

Lauren Liess Interiors

Much like muslin, drop fabric is neutral and easy. You may choose to add depth or color to integrate it better with your decor. This talented DIYer stamped a pattern onto a big sheet of fall cloth and draped it on the infant’s crib. Initially an inexpensive utility cloth, it’s now transformed into a glamorous textile.

Mustard Seed Interiors

This is another creative use for fall cloth: upholstering furniture. Many times, conventional upholstery fabric is very expensive, so this could be an affordable and durable option. If the thought of white furniture is daunting, dye the cloth a darker color first.

decordemon

Duck Fabric

Duck cloth, that is made from cotton fibers, is also known as canvas. Like drop fabric, it is very durable, thick and stiff, making it a choice for outdoor jobs.

Although it’s not as soft as muslin, it is still simple to dye and sew. Cotton duck are available at fabric stores, and it is usually available in basic colors. The natural structure of duck cloth makes it work well as a decorative lampshade, like in this undertaking.

Tobi Fairley Interior Design

Duck cloth is water resistant, so it is ideal for a DIY shower curtain. With a curtain linertreated or treated with a waterproofing spray, then it works well anywhere in the restroom.

More:
Ecofriendly Fabrics Make the Cut

Decorate With Burlap

See related

Contractor Tips: Advice for Laundry Room Design

Laundry rooms these days are migrating upstairs in basements, in which they have traditionally sat in the majority of homes. Occasionally these rooms are little more than two appliances and a slop sink within an unfinished area. While this is a step up from rubbing against the clothes on a rock at lake’s edge, the majority of people are looking to have a better laundry experience.

If you’re upgrading your laundry space but are still maintaining it in the basement, the issues you deal with are largely about aesthetics and function — better lighting, counter area and other common difficulties. However, if you are moving the setup to upper levels, there are distinct concerns. These are heavy-duty appliances one full of water and one with warmth, so you want to be careful. This advice can help you manage this serious situation with proper care and preparation.

Lucy Interior Design

One of the first upgrades to create to a laundry room is adding counter area. Front-loading washers free up space on top of the appliance, so it’s possible to install a counter top over the washer and drier. Be certain that you leave space for those machines to move without hitting the counter top. You will want to set up wood blocking to support the counter — don’t rest it on the machine.

Gingerwood

This chandelier certainly does sparkle, but it is not practical lighting for the laundry area on its own. Fortunately, it does not have to do the heavy lifting in this space because there are recessed lighting for ambient lighting and undercabinet lighting for task lighting. Other than additional counter space, better lighting is just one of the initial upgrades you need to create for your laundry area, so you don’t end up stepping from the house with a place on your top you could not see.

Tim Barber Ltd Architecture

To make the job of moving wet laundry to the dryer simpler, make sure the washer and drier are set up so that the door swing on every is opposite, and that the door of the dryer does not get in the way as you throw clothes from one to another. When you purchase appliances, ask the salesperson when the doors could be changed easily at home when the swing isn’t right about the one you purchase.

Rev-A-Shelf

Rev-A-Shelf Fold-Out Ironing Board – $190.30

If your laundry is in a place available to see as people pass through your house — such as a mudroom — you’ll want to keep things hidden. A number of the very same things that we install in kitchens to make life simpler work in a laundry too. If you’re constructing a laundry and kitchen at precisely the same time, consider mixing the cabinet order and get accessories such as this pullout ironing board. Or use the older kitchen cabinets in the laundry and add an aftermarket pullout trash can, such as the one available at Rockler.

Style Moe Kitchen & Bath / Heather Moe designer

The nearer your laundry area is to the remainder of your dwelling, the more sound will probably be an issue. If you are building the space from scratch, then install batt insulation in the walls to decrease noise. All these are heavy appliances that move around a good deal. If the laundry is going to be on an upper floor, the floor joists should be reinforced to handle the load. Stiffening the floor will also reduce noise from rattling objects nearby.

HARDROCK CONSTRUCTION

A noise you don’t want to dismiss is what is known as “water hammer” Newer machines add little bursts of water repeatedly, and the water turning off and on can liquefy the pipes in the wall, possibly causing leaks. Should you hear a clunking sound when the washer runs, consult with a plumber until it is too late. On the exterior of the wall, a burst washer hose can flood your house in a minute, so make certain you are utilizing stainless stainless steel reinforced hoses.

Tina Kuhlmann

The washing machine itself could flow, so if you are on an upper floor, then it should be set up in a pan with a drain, as shown in this picture. Better yet, tile the floor and have a floor drain installed. This way you will be prepared for any floods and you are able to mop the floor right into the drain.

Du Bois Design Ltd

The drying rack above the sink pictured here’s a terrific way to conserve energy, but you are going to want to eliminate the moisture in the atmosphere, so install a dehumidifier or an exhaust fan ducted to the outside.

Abbott Moon

We’ve talked a lot about water, but remember there’s fire in the area too. The most significant safety concern on your laundry area is the dryer duct. A smooth-walled rigid duct, properly set up using the minimal run and fewest number of functions is critical. Be sure that the dryer isn’t pushed against the wall, crimping the exhaust. Clean your lint filter and examine the ductwork and outside socket at least once a year to get lint buildup. You’ve made your laundry area beautiful and functional — don’t let a flood or fire ruin it.

See related

Quoin

Quoins are the rock blocks used at the corners of Georgian-style masonry houses. They were traditionally granite rectangles which were placed in an alternating pattern and functioned as a structural component to load-bearing walls. Now they’re primarily decorative and produced from any number of materials. Even foam can be molded into many shapes and glued into exteriors, developing a quoin that’s a lot lighter than cast rock and much more cost effective to install.

Tommy Chambers Interiors, Inc..

Quoins were used at corners to support the burden of multiple stories and rock roofs, in a time before architects had established internal load bearing structures.

Pursley Dixon Architecture

These quoins were applied into the stucco of the house’s facade in an alternating pattern, then painted to add comparison.

COOK ARCHITECTURAL Design Studio

The quoins with this Mediterranean house resemble limestone.

Triangle Brick Company

The brickwork on these exterior corners was set to resemble quoins.

Witt Construction

Veneers made from actual stone may mimic the appearance of quoins.

Dorman Architects

Quoins are structural, adding strength to the corners of structures, like those exposed rock slabs.

Read more quoin photographs

See related

20 Tools Every Homeowner Must Have

If you adore tools or just have to stock a simple toolbox, here are the top 20 crucial items to receive your little project done. How many do you have?

Connected: 14 Power Tools for Your Home Shop

Philips screwdriver. A Philips or X-shape screwdriver is most likely one of the most frequent tools in almost any toolbox. If you have a have a handle that takes interchangeable tips, you can cover a wide assortment of screw types and dimensions.

Flathead screwdriver. A flathead or directly screwdriver is invaluable; most light switch plates utilize screws that are straight, for example. Having the right size flathead may make a difference, so begin with at least a set of three (small, medium and big ) to have the ability to handle most jobs.

Tape measure. Your tape measure is crucial for estimating material quantities, figuring out placement of items, and calculating floor plans and furniture dimensions. It is almost always a good idea to measure more than once to make certain you’ve got it right.

Level. Some folks are good at eyeballing whether something is level or not, but this tool takes all of the guesswork away. It takes only a slight mistake to create things look off-kilter.

Utility knife. From cutting paint round windows that are stuck closed into opening boxes, scoring drywall or even trimming the edges of carpeting, the applications are so many that you’ll be surprised how you ever got by without one.

Hammer. Pounding nails, pulling nails, crowbar activity, tapping items into place — it almost goes without stating why you will need hammer. A costly hammer is lightweight and long; its own leverage can help you once you take that wall down.

Putty knife. A putty knife is great for scratching dry glues and paints and for dispersing putty, paste and spackle. Possessing a 11/2-inch dimensions for scratching and a 5- or 6-inch one for spreading is helpful.

Nail collection. A nail place is utilized for hammering nail heads below the surface of the timber, so that you can then fill the hole with wood putty and sand itto create the nail vanish. This way the hammer never has to create an ugly dent in the surface you’re pounding.

Combination square. This multiuse tool may confirm 90- and – 45-degree angles for miter cuts, quantify depths and short distances, and also is great for scribing a direct line. It also has a vial to make certain that your job is level or plumb.

Pliers. The serrated jaws of pliers help with holding objects firmly, in addition to with pulling, pinching or bending metal.

Adjustable crescent wrench. There is a screw built into the mind of the wrench; turning it adjusts the size of the opening, so that it fits onto most any hexagonal nut. Turning a nut with pliers only strips the borders, making it harder and more difficult to get a good grip when tightening or loosening it.

Cable stripper. This wire stripper includes a blade for cutting cord to the proper length and several notches for scoring the insulation round wires of varying dimensions, which may then be pulled off. Wire needs to be exposed without the plastic coating to produce electrical connections.

Hex key application (or Allen key). Many screws, particularly bikes and assemble-it-yourself furniture for which a flush screw is essential, utilize hexagonal sockets. Multiple hex key dimensions can be purchased separately and the leverage on those is better, but a jackknife-style place like this provides all you need in 1 tool.

Power drill. Drilling suggests generating holes, along with a power drill is the ultimate luxury when tired hands have turned a lot of screws. It adapts not only to drill pieces to bore holes, but also to each kind of screw-head bit, making bigger projects go fast and with less muscle. Just be cautious to stop when the fastener is tight so that you do not strip the screw head. Don’t skimp on this instrument — you will appreciate having a good deal of power.

Electrical cable. A rocky, well-insulated indoor-outdoor power cable for high-amp tools can help you expand the limited cord of your tools to your job site — and it’s acceptable for yard work too.

C-clamp. This instrument may hold pieces of metal, wood, or plastic collectively once you want to paste, saw or file them. Use a thin shim between the clamp and the thing you’re working on this clamp doesn’t mar the surface.

Flashlight. Needed repairs may occur in dark, cramped spaces as well as when the power is out. Additionally, everyone loves to help by holding the flashlight for you. They do not work without batteriesso have extras on hand.

Ladder or step stool. Painting, reaching the lightbulb, shifting fittings, trimming the hedge, stringing lights, getting into the loft and a lot more activities require the aid of a ladder.

Broom and dustpan. When projects get messy, save your loved ones broom from harsh debris from having a committed set.

Music. Every job is made easier with music or talk radio. That is the reason why hardware stores sell radios, although these are more rugged, with rechargeable battery packs that may also be used on your cordless tools. More rocky means when you drop your hammer onto it, you simply pick it up and return to work.

More: 14 Power Tools for Your Home Shop

See related

Gorgeous Desert Hillside Home in Arizona

When building a house on a gorgeous desert hillside, you have some significant website planning and technology to think about. When designing a house nestled into the side of a rocky hill outside Phoenix, architects Jon Bernhard and Mike Wetzel of Swabuck Partners knew they had to bring in the engineers and the big trucks — large trucks filled with massive boulders. The boulders assured that the hillside was stable and kept its natural beauty, and they enhanced the way the house and its built landscape related to the spectacular surroundings.

The architects have been”guided by the owners’ appreciation for outdoor living as well as the qualities the native desert offers,” says Bernhard. Single-slope, computer-engineered roofs accompany the slope of the hillside. “The deep roof slopes fit and follow the mountain slope, and cantilevered terraces soften the home’s imprint on the property,” says Bernhard. “This light touch on the website is further symbolized with the usage of desert colors, textures and by blurring the line between the indigenous and the man-made by participating boulders and landscaping within the living spaces.” This included integrating water, which cascades down the hill and appears to continue upon the terrace and out beyond the entrance.

All the interior spaces take full advantage of the natural lighting and surrounding views, and it’s hard to understand where the insides end and the outside begins. Both inside and outside, spaces range from towering and receptive to small and intimate.

Since this house transitions so easily from front to rear, side to side, and inside and outside, it’s only fitting that we will be hopping from outside to inside and back out again along this tour.

at a Glance
Who lives here: A family of five
Location: Outside of Phoenix, Arizona
Size: 19,000 square feet; on about 5 acres; 4 bedrooms, including a guest house with 1 bedroom and one bath
That’s intriguing: Some of those boulders added into the website proved so big that they had been brought in singly on their own trucks.

Swaback Partners, pllc

An axis of water ties the front of the house to the back. A waterfall flows down from the top of the hill, and due to this axis, there is an illusion that it flows beneath the rear patio, is brought through the house and terminates at this fountain.

Swaback Partners, pllc

The single-slope roof structures follow the slope of the hillside, making the house seem to be a part of the hill. The municipality didn’t need a three-story structure, so a garage is cleverly tucked underneath the primary living floor (far left side of this picture ), even though a master suite occupies the upper floor over a different portion of the house (toward the ideal side of this picture ). The construction you find on the far right is another guest house.

“We implemented boulders into the sides of the walls along the drive to make it seem like it was carved out of the hillside,” says Wetzel.

Swaback Partners, pllc

The main entryway is an inviting gem box also makes the most of local materials and light. The entrance door consists of 5-inch-thick mahogany panels floating between layers of laminated glass. A grid of 21 panels of onyx appears to float across the entrance. During the day the sun glows through; backlighting provides a warm and inviting glow at night.

Swaback Partners, pllc

The front door is aligned with an expanse of glass that opens out to the backyard and a view of the hillside. The grid of onyx hovering overhead highlights the axis in the front entrance to rear. The water also highlights the link by the hillside waterfall into the fountain in the front.

Swaback Partners, pllc

An individual can follow the water out of the pool and fountain out front into the pools round the rear entrance and up the hill.

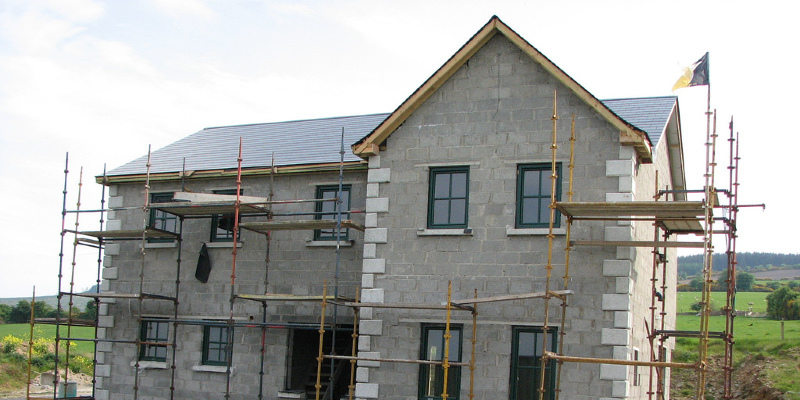
“The hillside was reconstructed to stabilize it,” clarifies Wetzel. This meant that the existing hillside was covered in a geotech mesh for security, and boulders were brought in and proceeded to pay for it. The team engineered the waterfall found previously, which offers soothing sound and brings the eye up to the top of the hill.

Swaback Partners, pllc

Through the front door, a gallery-like hallway leads to the fantastic room.

Swaback Partners, pllc

At the excellent room a grid of Fossil Creek flagstone highlights verticality. “The 24-inch by 24-inch grid lines continue up to the swimming pool and the guest house,” says Wetzel. This is one of those design moves that joins the inside and exterior design.

Swaback Partners, pllc

The towering ceiling in the excellent room articulates the hillside-driven incline of the roof.

Swaback Partners, pllc

“The indoor design and the outdoor architecture each speak for themselves, but they also blend together really well,” notes Wetzel.

Swaback Partners, pllc

The entrance terrace leads from the garage level up into the front door. The guest house is located on the ideal side of this image.

Split-face Mesastone adds purple-haze colors in the mountain into the facade and introduces a different feel. Weathered penny copper adds to the glow overhead.

Swaback Partners, pllc

Pocket doors open the fantastic room up to the entrance terrace. Large cantilevers offer shade from the Arizona sun, keep the house cooler and make terraces. In addition they produce a transitional space that continues to blur the lines between inside and outside.

Swaback Partners, pllc

“Substantial lengths of glass and clerestory windows offer natural daylight during every room in the house,” says Bernhard. “Floor-to-ceiling glass and also the avoidance of finish-material changes at exterior wall lines deliver expansive indoor-outdoor living environments.”

Swaback Partners, pllc

The sheets of glass that you see about that breakfast area are pocket doors, which transform the enclosed room to an al fresco dining space with a few straightforward slides.

Swaback Partners, pllc

The kitchen picks up on a darker desert palette that includes Red Dragon granite and Wingate black cabinetry. Smaller-scale components, like the backsplash tiles, make a more intimate feel.

Swaback Partners, pllc

In a house so receptive to the exterior, solitude is essential. Metal mesh sunglasses provide it in this powder room.

Swaback Partners, pllc

A bedroom opens into a mountain patio and abuts 12-foot by 18-foot boulders. “We placed each of the boulders to look natural and not contrived,” says Wetzel.

Swaback Partners, pllc

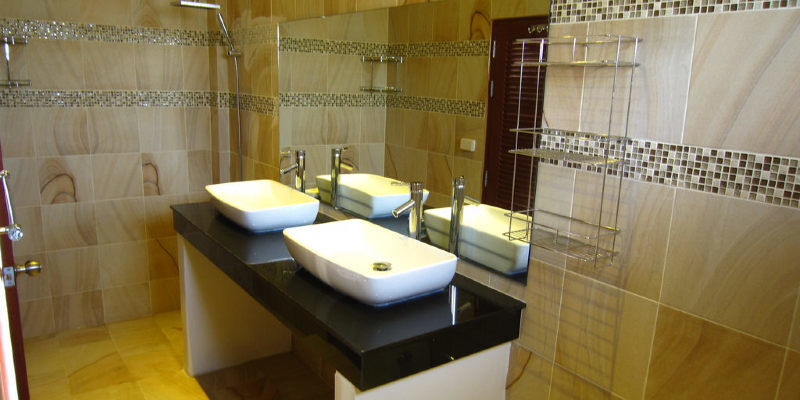
Constructed up into the hillside, this bath enjoys a grand view of the boulders.

Swaback Partners, pllc

“Anywhere we can monopolize on integrating the natural light to the inside, we did,” says Wetzel. Case in point: The deficiency of risers on such white oak staircase opens up the view to the large window at the landing.

Swaback Partners, pllc

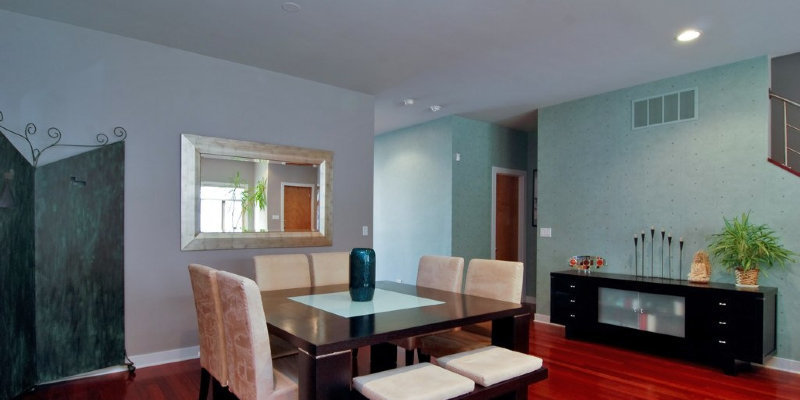
Upstairs, a sitting room in the master suite gets the top floor its own retreat.

Swaback Partners, pllc

“We altered the grid in the master bath to make it more human scale,” explains Wetzel. The 24-inch by 18-inch limestone highlights horizontal lines, while green slate presents a new substance and cooler colors.

Swaback Partners, pllc

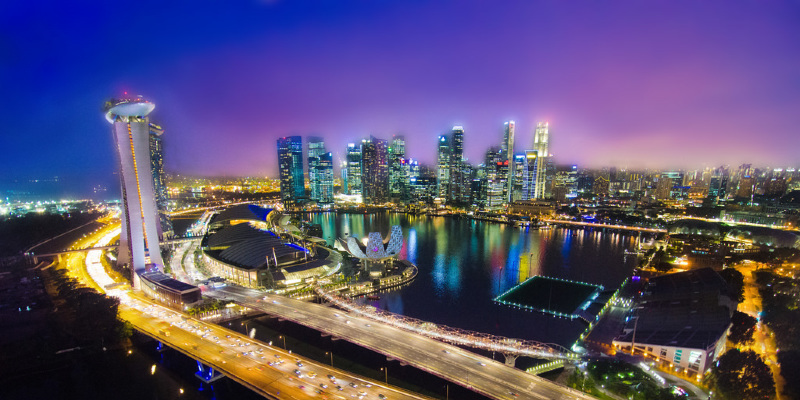
“The master bedroom has a to-die-for view,” says Wetzel. “You seem out to the mountains and will see the city lights in the distance.” To take advantage of this opinion, a motorized 12-foot x 15-foot doorway opens into a private patio that has a fire pit.

Added soft light comes in the Sapele mahogany ceiling coffers.

Swaback Partners, pllc

The view from the top of the hill to the backyard is spectacular. An upper patio with its own fire pit provides an intimate, tucked-away outdoor area and a view of the city lights at night.

Swaback Partners, pllc

The designers made certain that the tint of the patio’s cement matched the landscape.

Swaback Partners, pllc

Well-placed boulders cleverly conceal an outdoor shower, providing solitude yet keeping the open-air feeling.

The job took 20 weeks from begin to finish, including all of the extensive site work. “On a job like this, it’s always scary at the start to see how much has to be done. It is an excellent feeling to receive it right, down to the tiniest details, and execute something outstanding,” says Wetzel.

More:
Architect’s Toolbox: Wash the Wall With Sunlight
Gracious Hacienda in Mexico

See related

Mood Makers: Small Rooms, Spacious Feel

Many decorators like to keep their secrets to themselves but I’m not among them. Over the years, I’ve learned lots of secrets for earning a space feel larger. Even the smallest area can seem more spacious if you’re privy to some little empowering information. (Not all of the chambers below are tiny, incidentally, but they show the principles)

Abbe Fenimore Studio Ten 25

The main thing to remember is that the more floor space you can see, the larger the room will look.

MANDARINA STUDIO interior design

Keep areas beneath furniture free and clear to make the region feel larger.

Cornerstone Architects

This distance is not modest, but it shows how keeping the floors color exactly the same from room to room furthers the feeling of spaciousness.

Eleven Interiors

Remove your area rugs and scatter rugs. Unbroken floor space always makes a room look larger.

Frederick + Frederick Architects

This includes tub mats in the toilet — couple of things make a toilet room look smaller than chopping up the flooring with tub mats. There’s a reason you don’t see them in design magazines.

Jump the skirts on upholstered furniture. Incorporate Lucite or glass tables and pieces.

Dream House Studios

Let your light shine! A well-lit room always looks larger. Let from the organic light and include lots of attractive artificial light in the form of hanging light fixtures, sconces and lamps.

CWB Architects

Mirrored furniture and framed mirrors reflect light and distance — use them to your advantage in a small room.

Mary Evelyn Interiors

Install French doors, get rid of heavy window dressings and banish your sheers to make your room feel more spacious and open.

Kristie Barnett, The Decorologist

Tall pieces of furniture from the far corners of a room draw back your eye and make the room look larger, especially if the furniture is light-colored, such as these white armoires (click photo to view full view).

Michael Abrams Limited

This interior exemplifies how the warm, neutral wall color throughout a spacious floor plan, together with lots of different light sources, draws your attention all over the space and expands the sense of size.

Tell us How do you create your space sense larger?Share your tricks from the Remarks section below.

More:
Small Space Trick: A Great Big Mirror
Ideas for a Smaller Bathroom

See related

Renovation Detail: The Eyebrow Dormer

Celebrity fun facts collect, and one of my favorites is that Whoopi Goldberg does not have eyebrows. She goes from eye to hairline. It does not hold Whoopi back at all, but eyebrows are important — they break up the forehead and put in curvaceous interest to somebody’s facial structure. So when a home comes along with a large grand roof, sometimes you’ve just got to add an eyebrow dormer.

Eyebrow dormers have a low profile and raise a wave in the plane of a roof’s shingles. Originally made for medieval thatched roof cottages, the eyebrow dormer was created to welcome light and add ventilation. However, eyebrow dormers were made popular in the United States when shingle-style architecture emerged in the mid to late 1800s. Mainly seen in New England, eyebrow dormers were utilized as an enchanting visual apparatus to break up the extended expansive roofline of beachfront shingle-style homes.

Today, eyebrow dormers are found on houses of all shapes and sizes. And while they’re expensive to install and complex to make, if a gifted craftsman is up for the challenge, they will drastically enhance your home’s look.

TEA2 Architects

Centered above the front entry, an eyebrow dormer breaks up the extended expansive roofline on this lakeside shingle-style house.

CG&S Design-Build

An eyebrow window has been cut to the roofline to flood this converted loft with daylight.

Daniel M Martin

Numerous eyebrows produce an undulating wave effect.

Thomas Rex Hardy, AIA

The eyebrow is treated as a separate roof on this pool home, with all the curve coated in weathered copper.

CG&S Design-Build

The curvaceous lines of the eyebrow dormer offset the sharp summit of the house’s front gable.

Reynolds Architecture- Design & Construction

An eyebrow dormer unites with angled cross balustrades, a cupola and cedar shingles to make an exterior rich with architectural interest.

Asher Associates Architects

Multiple dormer fashions can work superbly together on a home’s exterior. On this particular coastal New Jersey house, an eyebrow and a shed dormer team up.

Asher Associates Architects

Feast your eyes on this superb cathedral ceiling featuring a set of eyebrow dormers.

TEA2 Architects

Centered above the front door, an eyebrow dormer breaks up the wide monotonous roofline on this lakeside home.

Melaragno Design Company, LLC

A eyebrow dormer graces this Arts and Crafts–moved residence and melds beautifully with the home’s knee braces and square feet.

Jeffrey Dungan Architects

Reminiscent of a thatched cabin, this house goes back to its basics.

See related