Styles of Manufactured Homes

Manufactured homes fall under the umbrella of what’s known as prefabricated houses, including modular houses. Also known as “pre-fab” residences, manufactured homes differ from site-built residences in that much of the building is done in a factory. The modules or components are sent, and final construction happens at the house’s location. The advantage of this procedure is that the general contractor can save yourself time and money by not having to deal with subcontractors, and the components can be created at a lower price.

Generated vs. Modular

Modular homes are built in sections known as “modules,” along with the sections are transported into a site for final assembly on a foundation. Manufactured homes used to be understood as “mobile homes” or trailers; they are assembled completely at the factory, and the final product is sent as-is to the site. Manufactured homes typically don’t have a lasting foundation, but homeowners may elect to build one. Eventually, manufactured homes can be placed in trailer parks or on personal property.

Styles

The style of a manufactured home depends upon the number of sections comprise it. The average section measures eight to 14 feet wide but that can vary among producers. Bigger homes are made up of several sections combined and customized. Unlike modular homes, manufactured homes are only available at single-story configurations. Architectural styles include ranch (typically narrow and longer), cabin-style residences (square with hardwood siding), as well as high-end estate homes with atriums. Floor plans can contain porches and garages made from additional sections.

Customization

While floor plans may seem similar on paper, you can personalize a brand new manufactured home by choosing different materials for the roof and siding and selecting a variety of colors and design elements for the inside. More expensive residences feature real wooden cabinetry and provide buyers more carpeting and flooring options. If you buy a used manufactured home, you can replace different elements to better match your taste, just like you can do in a conventional home.

Regulation

All prefabricated homes fall under the purview of the U.S. government. The Department of Housing and Urban Development regulates structure of manufactured homes to be sure they arrive to safety standards. Additional regulation and requirements for modular homes are imposed by states or localities and are subject to local inspection after on-site assembly. In California, additional state regulations address earthquake along with other regional safety concerns.

See related

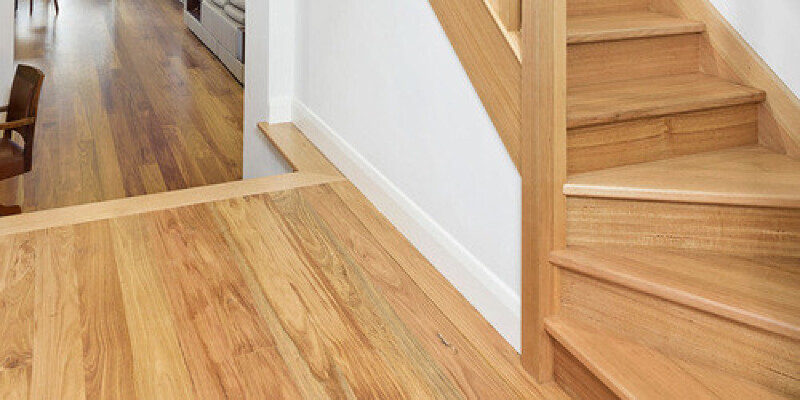
How to Complete Australian Cypress Wood Floors

Australian cypress, also referred to as cypress pine, is a heavily knotted softwood flooring material. It adds a rustic elegance to rooms and is a common choice for restaurants, cabins and other interior spaces where flooring with additional visual character is an advantage. Available in a selection of shades from honey and cream hues to deep amber, with dark brown or black knots irregularly distributed, Australian cypress is rated at 1,375 on the Janka Wood Hardness Scale. Although it’s officially classified as a softwood, it’s harder than American red oak and also provides durability and long life with frequent maintenance. Several considerations must be kept in mind while finishing Australian cypress.

Sanding

The aromatic, refreshing scent connected with Australian cypress flooring is produced by the timber’s high resin content. This leaf may extrude throughout the grain of the wood, especially at the place of knots. Australian cypress ought to be sanded with sandpaper that’s changed frequently to avoid the accumulation of wood resin on the newspaper. Additionally, avoid sanding so aggressively that resins are heated up and discharged from the wood. In case the resins are redistributed throughout the surface, then more sanding will be required to remove them. Begin with a coarse grit of paper that cuts the wood efficiently and progress to increasingly finer grits to reach a smooth surface. Don’t use sandpaper finer than 120-grit. Since the high number of knots in each plank are harder than the surrounding clear wood, sand in a 45-degree angle to the grain.

Sealing

Conventional vinyl wood sealers and finish may not stick properly to Australian cypress, particularly around knots, where the oil-based finish may stay sticky instead of curing. A single-component, permeable paints devised for general wood sealing and applied in accordance with manufacturer’s directions is one choice for the first coat after sanding. Some commercially available finishes additionally include a sealer, however, and may be applied directly after sanding without using a separate sealer.

Finishing

Apply a water-based polyurethane and acrylic finish formulated for hardwood floors. These finishes can be applied with a brush, a roller or a T-bar applicator. Three uniform coats must be applied in addition to the sealer, allowing each to dry completely before applying the next coat. Don’t apply two or more coats in a 24-hour period. A smoother surface can be produced by lightly sanding with mesh sanding screens between coats. Heavy furniture can be carefully placed in the room after the final coat has dried for 24 hoursnonetheless, allow the finish to cure for eight to 14 days before putting rugs or carpets on the ground or allowing heavy foot traffic.

Care

Dust-mop regularly to remove grit that dulls the finish and damp-mop when necessary to remove dirt. Use rubber or felt protectors on furniture legs and minimize traffic in shoes that are crocheted. Like most wood flooring, Australian cypress maintains optimal dimensional stability in inside states with relative humidity between 35 percent and 55 percent.

See related

How to Install an Integrated Dishwasher

An integrated dishwasher is automatically not any different than a standard built-in dishwasher, but aesthetically it’s quite distinct. An integrated dishwasher has mounting brackets and hardware for installing a cover panel which matches the remaining cupboards in the kitchen, making the installed integrated microwave appear like another cupboard. You can set up an integrated microwave’s plumbing and electric in precisely the same fashion as a standard built-in dishwasher in around an hour with a few common hand tools.

Switch off the breaker to the dishwasher’s wiring, and verify that the power is eliminated by holding a noncontact electrical tester against the electric cable below the kitchen sink. If the tester’s light comes on, turn off more breakers or the main breaker to the home until the tester indicates that power is off.

Switch off the water main to the home, then turn on the kitchen faucet to get rid of any water pressure within the system. Remove the hot water supply line to the faucet with an adjustable wrench. Hold the distribution valve with one adjustable wrench and loosen the fitting over the tube with another adjustable wrench. Pull the valve off, the tapered ferrule and the coupling from the tubing. Slide a coupling and ferrule from a dual-feed provide valve over the tube, then connect the valve to the end of the tubing. Finger-tighten the coupling, then fasten the coupler to the valve with the adjustable wrenches. Combine the faucet’s hot water supply line to one of this feed nipples onto the valve and tighten the coupler having an adjustable wrench.

Disconnect the mounting hardware and bracket from the front of the dishwasher as outlined at the unit documentation. Center the bracket over the back side of a matching cabinet panel, and mark the hole locations for the mounting screws through the bracket’s holes. Pull the bracket from the panel and drill a shallow 1/8-inch pilot hole using a power drill to the panel at each hole location. Then reposition the panel and drive one of the included mounting screws to each mounting hole. Replace the panel on the front of the dishwasher.

Open and shut the door to confirm the operation of this doorway. If it opens and closes properly, hold the doorway at a 45-degree angle and let go of the doorway. If it doesn’t stay at a 45-degree angle by itself, tighten or loosen the doorway spring in accordance with the manufacturer’s recommendation.

Cut a hole between the lower, back-edge of this side of the sink cabinet and the dishwasher cabinet with a hole saw. Feed the electrical cable through the hole to the dishwasher cabinet.

Attach a flexible supply line to the water inlet on the back of the dishwasher. Position the dishwasher in front of the cabinet opening, and feed the ends of the drain line and the supply line through the hole to the sink cupboard. Push the dishwasher to the cupboard and pull the slack of both lines to the sink cupboard.

Adjust the toes of the dishwasher so that the top edge of the doorway is even with the bottom of the countertop. Open and shut the dishwasher door a couple of times to ensure that it doesn’t scrape on the countertop. Then fasten the microwave mounts into the bottom of the cabinet frame with the included mounting screws and a power drill.

Reach under the dishwasher and pull on the electric cable toward the front of the unit. Slide the end of the cable to the wiring clamp, and push about 8 inches of wire to the wiring compartment prior to tightening the wiring clamp with a screwdriver. Remove the outer sheathing from the cable inside the compartment with a knife. Then strip 1/2 inch of insulation from the ends of the white and black wires.

Combine the end of the black cable from the electric cable to the black cable from the dishwasher with a wire nut. Then connect the white wires in similar fashion. Wrap the end of this bare wire around the green grounding screw and tighten the screw with a screwdriver. Snap on the wiring compartment cover to position over the front of the compartment, then put the lower panel cover across the bottom edge of the dishwasher, and fasten it with both mounting screws.

Connect the drain line to the dishwasher drain on the trash disposal, and tighten the clamp with a screwdriver. Then connect the supply line to the open feed on the warm water dual-feed provide valve beneath the sink. Tighten the coupler to the valve with an adjustable wrench.

Turn on the water main and the electric circuit. Examine the operation of the dishwasher and await any leaks.

See related

What Does "Resulting LTV on Mortgage Loans" Mean?

If you don’t pay money for your house, financing the purchase ends in a mortgage loan equal to the price of the house minus the down-payment amount. For lenders, financing a house loan is a danger that must be assessed. The danger level is higher when the borrower’s down payment is reduced. Lenders evaluate the probability of a loan by calculating the loan to value ratio.

Loan-to-Value Ratio

The loan-to-value (LTV) ratio is a number used by lenders to evaluate just how much is financed or owed on a property in relation to its value or purchase price. The lender uses this ratio to evaluate the amount of risk involved in financing the property. The higher the percentage, the greater risk involved with the mortgage loan.

Calculating LTV

Figure the percentage by dividing the total owed on your house by its value. When first buying a house, this LTV mortgage relies on the original purchase price minus the down payment the buyer is currently supplying. If the homeowner buys a house for $100,000 and places $20,000 down on the house, he is financing $80,000 of the purchase price, leading to an LTV ratio of 80 percent.

Common LTV

Traditionally mortgages were given to borrowers who put down 20 percent and financed 80 percent of the purchase price. This gave the new homeowner 20 percent equity in her home. To promote homeownership and provide opportunities to those who don’t have the money for a 20-percent down payment, the Federal Housing Authority (FHA) insures loans for which the buyer is only required to have a down payment of 3.5 percentage of the purchase price of the house. This FHA down payment provides a home buyer an LTV ratio of 96.5 percent. A 10-percent down payment results in a LTV.

Value vs. Price

In a house purchase, a part of the purchasing procedure includes the creditor getting an appraisal on the home being purchased. In an appraisal, the property is in comparison to similar properties in the region that have recently offered to ensure the purchase price of the house is consistent with home worth in the neighborhood. If the price is higher than other properties in the region, the creditor may recommend the seller lower the purchase price to local levels before approving the loan.

Factors

A low down payment that raises the LTV percentage leads to a higher monthly mortgage payment. Additionally, without a 20-percent down payment, the buyer is required to pay private mortgage insurance (PMI) or, together with FHA loans, a mortgage insurance premium (MIP), which also raises the monthly payment.

See related

What's APR on a Home Mortgage?

The yearly percentage rate is the total annual cost of a mortgage and can be expressed as a proportion of the amount of the loan. The APR takes into consideration the overall expenses of home ownership when obtaining a mortgage. The overall costs include certain fees like interest, lender charges, mortgage insurance and factors.

Identification of the APR

When shopping for a home mortgage, it’s very important to compare the APR into the interest rate quoted. The APR is slightly greater than the interest rate–generally, nearly 0.25 percent greater. Settlement fees increase the APR.. The settlement charges to compare when looking for the best APR are origination fees, discount points, mortgage broker fees, tax/flood support charge, assumption fees, mortgage insurance premiums, dedication fees and program fees. The greater the loan charges, the greater the APR.. The reduced the loan charges, the lower the APR..

Requirements

According to the federal Truth in Lending law, financial institutions are required to provide you with certain disclosures when you apply for a home mortgage. This legislation prevents financial institutions from concealing various fees and prices from borrowers. Two disclosures that play an important part when comparing APR are the good faith estimate, or GFE, and the truth-in-lending disclosure. The GFE Includes an estimate of these charges contained in the APR.. The truth-in-lending disclosure provides you with the interest rate quoted along with the APR.. Upon receiving the necessary disclosures, you can ascertain the real cost of obtaining the mortgage loan.

Comparisons

Since loan fees consistently boost the APR, buying the lowest fees is essential. 1 approach to accomplish this is to compare the charges by reviewing the creditor’s good faith estimate. The largest fee to compare is the origination fee, also known as the mortgage broker fee. Compare the program fees for origination and processing of the mortgage.

Misconceptions

The APR does not include third-party charges like appraisal costs, inspection fees, settlement fees, title search and appraisal fees, title insurance costs, recording fees and taxes. These third party charges are paid to title companies, appraisers, lawyers, insurance companies and inspectors. An appraiser performs the property appraisal and can be paid on that date, not in the loan closing. A title company performs the title search, examination, title insurance and closing; an lawyer may conduct these duties too. Recording fees cover the county clerk to record the deed and the mortgage. A building Inspector performs termite inspections, water tests and structural inspections of the house.

Factors

When calculating the APR, loan fees are added into the initial mortgage amount. The APR is then calculated assuming the mortgage loan is retained for a standard 30-year term. Borrowers who wish to market their house in a short time period may not have to compare the APR on various loans. Other creditors, like those that are refinancing or searching a house equity credit line, may not have to compare the APR either, since the loan is generally retained for a shorter duration.

See related

Is Hazard Insurance the Same as Homeowner's Insurance?

Hazard insurance and homeowner’s insurance are not the same. Insurance, which protects you financially from the consequences of harm and theft, is bought as part of your homeowner’s insurance plan. Homeowner’s insurance also comprises liability insurance, which pays medical bills when a person is injured on your premises, and legal costs when he decides to sue you because of this crash.

Features

The homeowner’s insurance coverage, the hazard insurance in HO-3, protects homes against any harm except those specifically exempted in the coverage. It protects the contents, like clothes, furniture, appliances and books, against harm from 16″named perils,” that the Insurance Information Institute states. In addition to hazard insurance, H0-3 also provides liability coverage; most policies also supply living expenses if you’ve remain elsewhere while your home is being repaired.

Types

Kinds of hazard insurance offer various degrees of help if you repair or rebuild, the Investopedia website states. Cash-value policies will pay what it initially cost you to buy something–a tv or a sofa, say you’ve owned it. With a coverage, you receive enough cash to get a new thing. Secured or extended-replacement cost will pay to rebuild the home even when the purchase price is more than the limit on your coverage.

Function

For mortgage lenders, the role of hazard insurance is to protect their investment in your home. You’ll need to buy at least a minimal level of hazard insurance to carry out a mortgage, according to the Nolo website that is lawful. As soon as it’s possible to buy the compulsory policy and more, most borrowers take out homeowner’s insurance to add liability coverage as well.

Size

Your homeowner’s insurance policy must include sufficient hazard insurance to pay for rebuilding your home; the bigger and more expensive the home, the more insurance you’ll want. The liability insurance on your homeowner’s coverage, on the other hand, isn’t affected by home size; CNN recommends $300,000 of liability policy, more in case you have sufficient wealth to need added protection from lawsuits.

Limitations

If there’s a risk of flooding or earthquake on your community, you’ll want to take out different policies to handle them, because homeowner’s insurance does not cover against these perils. In case you have particularly valuable possessions such as electronics, collectibles, furs or art, you might have to take a”floater” to cover them, Investopedia states, because the hazard insurance on your homeowner’s policy limits the policy on valuables.

See related

Guest Picks: Beautify a Toilet on a Budget

Living in a 1,500-square-foot house is no easy feat when you are a household of four. Three bedrooms, two full baths — it seemed really spacious when we were just a family. But living with two growing kids (one of whom is a tween, oh boy) who share a little bathroom which also functions as our guest bathroom is tough. Never mind our lack of cupboard space or the fact that our formal dining room has turned into a house office, the little hall bathroom requires a update! After years of talking about it, my spouse and I’ve decided to pull the trigger and perform the renovation ourselves using a budget that is as small as our residence. — Michelle from Stuttering Shell

IKEA

Lillången Sink Cabinet With 2 Doors and 2 End Parts, Aluminum – $249

After spending hours searching online and taking countless mobile phone pictures at the local home improvement store, I finally discovered the perfect dressing table for the hall bathroom remodel. The distance is small, and this sink will fit straight in. It is going to also look great too.

Crossville, Inc..

Ebb & Flow Sand and Surf Porcelain Tile

This mosaic is perfection. I adore the beachy colors, the soft expression of the sea glass and the fact that it will perfectly fit the toilet’s new flooring.

The Home Depot

Pegasus Exhibit Single-Handle Tub and Shower Faucet, Brushed Nickel – $69.03

Brushed nickel tub and shower fixtures for under $100? Sold! Plus, I really like their straight lines. The only problem now is finding a sink which matches.

The Home Depot

Pfister Vega 4-Inc Single-Handle Mid-Arc Bathroom Faucet, Brushed Nickel – $134.82

The hunt for a new sink faucet has ended! I don’t like that I am spending more on this piece than I am on the bathtub and shower fixtures, but that is a good match and undoubtedly what I am searching for.

The Home Depot

ASB Firenze 5-Foot Left-Drain Soaking Tub, White – $198

Shopping for a new bathtub insert can provide you sticker shock. Fortunately, there are a few quite affordable options out there. This is important when you’re renovating a bathroom on a little budget.

Amazon

Tropical Nautical Starfish Single Wall Towel Hook – $13.99

Sure there are a couple of hooks on the back of the bathroom door, but the new hall bathroom will require some additional towel hanging area. This starfish hook screams beachy chic, and it’ll look great in a group of three on the freshly painted walls.

IKEA

Lillången Mirror Cabinet With 2 doors and 1 End Unit, White – $90

The bathroom currently has another mirror and medicine cabinet, and it appears quite obsolete. Because the new vanity does not offer much counter space, I wish to maximize storage. This bathroom cabinet matches the dressing table and offers just a little more room with the shelves.

Anthropologie

Sea Coral Trinket Dish – $18

The bathroom cabinet has three little shelves on one side which are yelling for accessories. I adore these nautical-inspired trinket dishes from Anthropologie. I am having trouble choosing which ones to get.

Florim USA

Stratos Avorio Tile

The current bathroom floor tile isn’t my favourite, and after 10 decades of living with it, I am ready for a change. Sure, the former owner upgraded the floor from linoleum, but still. This porcelain tile appears exactly like wooden white marble. I chose 6-by-24-inch planks to the new bathroom floor.

Lowe’s

American Olean 3-by-6-Inch Bright Ice White Ceramic Wall Tile – $4.82

My existing tub/shower is old and dated, and the fiberglass insert has seen better days. Plus, its almond colour isn’t very attractive. My husband plans on laying 3-by-6-inch bright white ceramic subway tiles in the shower. We plan on dividing the white using a waterfall of the Sand and Surf mosaic tiles and an accent band around the top of the shower.

The Home Depot

Behr Premium Plus Silver Screen Interior/Exterior Paint

1 wall of my own foyer is painted in this colour. The hall bathroom is currently a mild sea glass blue colour, but I feel a fresh coat of paint will be essential when the bathroom renovations are complete. My conscience and I think that this light grey will be perfect.

Kohl’s

Sonoma Life + Style Tiburon Shower Curtain – $59.99

This shower curtain is currently at the hall bathroom. I proposed on reusing it after the renovation, but I don’t think it will work with the light grey walls. My fingers are crossed, though, since I would really like to not have to purchase a new shower curtain.

West Elm

Stripe Shower Curtain, 72″x74″, Feather Gray – $29.99

Here’s a second shower curtain alternative. I really like the bold horizontal stripes, and it mimics the appearance of the glass mosaic tile. It is very grey, but I think it could do the job.

The Home Depot

Hampton Bay 4-Light Bath Bar – $14.98

I know, I know, you are probably thinking, “Is this really the light you picked out to the bathroom?” Yes it is. The bathroom is small, and the added cabinet/mirror unit above the sink will not be recessed into the wall socket. Therefore, this type of lighting is perfect. I realize that it screams “Hollywood movie star dressing room, ” but it works. In any case, the cost (less than $15) will allow me to splurge in different areas of the bathroom remodel.

Goal

Threshold Oil Can Beach Tall Soap Pump – $9.99

A new bathroom requires a new soap dispenser. As much as I adore Method hand soaps, I believe that this beach-inspired pump is perfect for the little space. The colour reminds me of sea glass also.

Goal

Threshold Chunky Bath Rug, Elephant Gray – $19.99

This dark grey bathroom rug will contrast well with the flooring while complementing the wall colour and enhancing the tile accents. It is going to also fill the floor area in front of the toilet and shower well.

Goal

Ogie Bath Rug, White/Aqua – $24.99

Here’s another bathroom rug alternative. I like the plan and appreciate that it isn’t 1 colour, so it is going to add a bit of interest to the floor. Decisions, decisions…

Overstock.com

Easy-Install Adjustable Curved Metal 1-Inch Space-Saver Shower Rod – $32.99

One of the greatest things you can do to help a little shower/tub combo is replacing the straight, tension-mounted shower pole with a curved shower rod. It opens up so much space in the shower. My current shower pole, which is curved, is now chrome. I would prefer a brushed nickel finish to match the other fixtures in the bathroom, however when it’s not in the budget, then the chrome pole will need to do.

IKEA

Åfjärden Bath Sheet, Green-Blue – $14.99

I am embarrassed to admit this, but my bathroom towels don’t fit the bathroom’s recent decor. Over time, a hodgepodge mixture of towels has collected, and they are used by us. So what should the bathroom is blue and the towels are orange? The new bathroom cupboard will have frosted glass panels, meaning that you’ll be able to see within the cupboard. I guess it’s time to replace the towels with fresh ones at a coordinating shade.

Kohl’s

Sonoma Life + Style Matted 8-by-8 Frame – $34.99

It appears absurd to hang pictures in the restroom, but I am not a fan of sterile walls. I plan to print a few pictures from family time in the shore and hang them in the bathroom for display. I adore the appearance of this framework.

Next: 7 Tile Tips for Baths on a Budget

See related

Guest Picks: Bring a Clear Winner With Lucite

Lucite has had a recent comeback in transitional insides, and I love it. I feel that a room needs something to grab your attention — something just a tiny bit different to make a statement — and also a single Lucite accent does that superbly. These are a few of my favorites. — Christina from Greige

La Fabrika

Display Me Box, High Square – EUR 44

Searching for wall art without having to commit? These display boxes are excellent for displaying the items you love in any area.

Greige

Lucite Cube – $1,135

This is an enjoyable little piece that can add just a little Lucite to your area. I use one as a table, but it would make a terrific extra seat also.

Williams-Sonoma

Crystal Block Lamps – $375

These Lucite lamps are a perfect base to build upon. They aren’t visually heavy since it is possible to see them through, and they won’t compete with blending styles and colours.

Greige

Lucite Deer Antlers – $185

Easy and clean Lucite antlers create a great display piece.

Peekaboo Clear Console – $379

This is one of my go-to pieces for a small space in need of a desk or small console. It matches perfectly in just about any decor.

IKEA

Tobias Chair, Clear – $79

Easy and clean are described with this side seat. It’s perfect for the desk and dining table alike.

SpoiledRottenDogz

Crystal Lucite Pet Dish – $35

For many of you pet lovers out there, this elegant Lucite dog bowl is unconventional and perfect for your small friends.

CB2

Peekaboo Clear Coffee Table | CB2 – $279

This bit is perfection for a small space since it keeps the look light and airy.

Gretchen Everett Hardware and Home

Acrylic Curtain Pole

I adore the idea of using Lucite as drapery hardware. It’s great if you want a light and airy space, and it prevents your hardware from feeling overly heavy.

CB2

Format storage shelf – $69.95

This Lucite wall storage is equally amazing. I love it for the bath and the workplace.

CB2

Format Memo Tray – $19.95

Desk accessories in Lucite are great for keeping it light on your desktop.

Erin Condren

Acrylic Box, Mi Amor – $75

I adore the idea of picking out my own layout for a personalized Lucite box. Use the boxes for cosmetics, decorative items or storage in your kitchen.

Neiman Marcus

Jonathan Adler Sheepskin Bench – $1,729

This sheepskin bench makes a statement. The Lucite on the bottom is the number one reason I love it, but the sheepskin on the top makes it enjoyable and applicable for many spaces.

1stdibs

Lucite Bar Cart

For those of you that love the idea of a bar but do not have the space, this mobile bar cart is your new best friend. It’s a great display for all of your bottles, also it may be used for a number of functions.

1stdibs

Steer Horn Bookends

These steer horn bookends are a conversation piece. You may use them in almost any room of the home.

Horchow

‘Solid Ice’ Vanity Accessories – $140

You can not forget that the bathroom is just as significant style-wise as any other room in the home. These Lucite bathroom vanity accessories are gorgeous and permit for any colour and layout to be implemented.

Pieces

Custom Lucite Lacquered Desk – $2,350

Desks are a necessity, whether as the main piece in your house office or as a bedside table. The mix of Lucite and white accents makes this one great.

Pieces

Lucite Frames – $20

You can not have too many image frames, and these will make a great addition to some tablescape or bookshelf.

greige/Fluegge Interior Design, Inc..

Here, a Louis Ghost Chair provides a few Lucite love.

Next: See-Through Storage: Clear Choice for Maximum Space

See related

The way to Trim the Wick in a Hurricane Lamp

Hurricane lamps, also referred to as flat-wicked kerosene lights, which have been utilized as a lighting source since the late 1800s and remain in certain homes today for nostalgic or ornamental purposes or as a practical backup light supply during an emergency. Unlike candle wicks, which can be woven in a manner that they will burn in the flame and basically self-trim, the wick in a hurricane lamp requires routine trimming to remove the charred residue that causes a dim smoking and fire.

Remove the lamp’s chimney or reveal the wick and extinguish the lamp’s fire, if it is lit.

Turn the regulating wheel that adjusts the wick height to reveal a greater quantity of wick

Cut the top of the wick off with a straight cut throughout the breadth of wick. You may also marginally trim the corners of the wick shirt so it’s a gently-curving shirt or cut it up at an angle to attain different fire shapes, as desirable.

Fix the wick height utilizing the regulating wheel to ensure about 1/8 inch of wick extends out of the mounting shaft that holds it.

Remove any charred remains or other debris in the burner screen to ensure airflow remains unrestricted.

Replace the hurricane lamp’s chimney. You can wipe any soot off of the interior of the chimney prior to replacing it, if needed, for a neater look.

See related

The way to Troubleshoot a Garage Door That Won't Open

A garage door stuck in the closed position may tempt you to crash through, but don’t let frustration get the better of you. Take a couple of minutes to troubleshoot some built-in safeties on your door that may block it from opening. Typical hotspots would be the battery, the wiring and the electric eye that prevents your door closing on pets — it can also avoid your door from opening. These basic checks can continue to keep the repairman away and save you big dollars.

Ensure the door is not in “Vacation” or “Lock” mode when it wo not respond to the remote from the exterior. When in one of these modes it may open once using the remote, then must be hardened from the wall control within the garagedoor.

Check the battery in your remote operator by walking into the garage holding it in your hand. Press the button as you see a small blinking red light on the box where the chain enters and exits. If the door opens as you get very near the box, but fails to start as you back away, the battery is low and needs to be replaced. When you can’t find any blinking red light whatsoever on top the box, the battery is dead.

Click the remote as you are standing beneath the box but can still see the top. If you’re able to see that the red light on top is blinking, it means that the battery is fine and that the problem exists somewhere else in the system.

Locate the fine wires that run away from the control box on the ground. There are lots of inspection factors, two run from the box into the manual switch on the wall — probably by the walk door, and four running from the rear of the box into the electric eye locations on both sides of the door a few inches away from the ground.

Hold the remote in 1 hand. Catch the wires a couple of inches back from their connection points with another hand. Wiggle the wires one by one while pressing the remote switch using another hand. If one of the wires is loose, when you wiggle it, then it will get the door to open. Explain the cable. Shut off the power to the garage door opener. Use a screwdriver to tighten the cable. Turn the power back and the door should open and close normally.

Examine the door’s electric eye. This feature normally only fails when the door is already open and won’t close, but some models won’t function either way. Just a few inches off the ground on one side of the track, you will find two small boxes that aim a beam throughout the ground at each other. If the beam is interrupted or won’t align, the door may not operate at all. Use a tissue to clean the electric eyes. The most frequently reason for this dilemma is a spider making a home in the eye, so if you are terrified of spiders, you might want to use something different to get him out of there.

Align the attention. If you’ve cleaned the eyes but the door still wo not budge, the eyes may be misaligned. The two eyes should be pointing directly at each other. They are generally mounted on thin bit of metal that will be accidentally bent. When it’s misaligned, you need to have the ability to see this. You can’t see the beam, but if you take the small box along with your fingers, you are able to bend it. Bend it a bit at a time, while clicking the remote until the door opens.

See related